Showing posts with label basing. Show all posts

Wednesday, May 27, 2020

Oathmark: Battles of the Lost Age ...Part II: Game on!


***Associated Narrative Post HERE ***

Hi all!

After the big build up of the last post lets jump right into the game and see how it plays out.  Just a reminder that this is a follow on to the previous post which laid out the background and army selection for this game.  In these posts I am presenting my initial experience and thoughts about Oathmark: Battles of the Lost Age.  The intro post can be found HERE.

Turn One
Right away I knew it was going to be and interesting night when I rolled for the very first initiative roll and wound up with this insane tie....

Saturday, October 25, 2014

Oldhammer in the NW prep...part 5

Well the big day is finally here, we'll be pushing around little lead man on a table in a few hours!  I got into Baltimore around 730 last night and set up with some of the boys at the drop zone. It was great to finally meet a few of my online chums in person.

When I got back to my hotel room I had a little bit of prep to do myself still ...I managed to complete some movement trays for my army and get the whole thing laid out on the table in the room.

These are iPhone photos so please forgive me for their quality.


And here are a couple quick shots of the table that Rusty made for the big RoC War bands game.


Cheers for now...back with a report on the day's activities later!

Blue

Thursday, October 23, 2014

Oldhammer in the NW Prep....part 4

Work progresses...basing done for now I'll add static grass if I have time.  Shields for Bugmans also compete and being attached.  I may add the classic Bugman B at a later date. Standards for The Brewers and Pikes have been rehabbed. Next: complete standard bearer for the clansmen!


Cheers,

Blue

Wednesday, October 22, 2014

Oldhammer in the NW prep...part 3

Time for another quick update on my preparations for this weekends event in Baltimore. I have completed the basing on the Warhammer regiments dwarves and I'm about halfway done with the remainder of the figures in need.  Here is a picture of them made process.

I have also started to get some paint on the bugman's shields, and the clansmen standardbearer is about halfway done as well.


I'm still feeling very stuck for time to get all of these tasks accomplished but as Erny recommended I'll just get as many done as I can and hope for the best.

Oh well better get back to it!

Cheers,

Blue

Tuesday, October 21, 2014

Oldhammer in the NW Prep...Part 2 Progress

Howdy all,

Just a quick note to post some progress on my goal of bringing my old units up to snuff for the coming weekend.

I've started with the biggest task which is rebasing about 50 figures.  To that end I replaced all the old green or otherwise painted bases and got busy getting sand glued to each and every one of them.  That happened last night.  Along with the bases I also chose the shields I will use for the Bugman's unit and the few I need for my Warhammer Regiments dwarfs.  These have now been primed...as has the standard bearer for the Clansmen unit.

Here is the group getting rebased and you can see the many shields I have mounted to a painting "handle"


I have also carefully removed the banners from the Pike Regiment and the Rangers Unit and I will try to do a little clean up and repair on those before reattaching them.

So all in all progress is good...but the bases are still very intimdating to finish in time.  I will put in a couple more long evenings on them tonight and tomorrow...but it wouldn't suprise me if I was still putting static grass on these on Friday night in the hotel room!

Cheers for now,

Chris

Saturday, October 18, 2014

Oldhammer in the New World Prep...Part I

Howdy all!

When the Oldhammer in the New World event was beginning to be discussed seriously last spring I had visions of arriving at the, yet far off, event with armies of newly painted and pimped out units.

...As the day has grown closer I had reset my expectations to having a few new units for the table top....

...an now reality has set in...there is less than a week to go before I have to hop in the car for an 8 hour trip to Maryland and I have no coherent fantasy force to bring for the table...sigh.

This summer has sucked for hobby time.

...so with little time to spare, today was the day to asses what I actually do have and what can be done to bring things together into a table ready force.

...So keeping mind that the GAME is the principal goal here I have decided to bring a couple of my classic units off the bench and give them a quick make over and get them on the table.  Now several of these units sport authentic late 80's-early 90's paint jobs....these do not measure up to their more recently painted brethren...but remember...the GAME is the goal.

Tuesday, April 8, 2014

LPL Round 2: Jenkins! Get over here! Alternative Armies Muster Troops

Hi all,

Just a quick note today to share with you the figures I used for Round 2 of the LPL.  This was the first un-themed round so I moved forward with trying to get some troops done for my growing 40k project.  For this purpose I painted up a team of not-Imperial guard troops using the excellent Muster Troops Figures from Alternative Armies Ion Age Range.

I attempted to imply a bit of a "story" with my team photo even though it is just on a gradient background...hence the name of the team...here is my entry pic.

Tuesday, October 8, 2013

Glam: My Oldhammer Day Golden Gobo Entry

Hello,

Time for a proper painting thread....it sure has been awhile!

As we are all now aware, the end of August saw the first of what I hope is many Oldhammer events...though this one will be hard to beat.  The Bring Out Your Lead event was held at the Foundry facility in Nottingham England...it featured all manner of Old School goodness....great games...displays of many epic figures and armies....discussions with some of the artists and games designers that made the games we all love so much unique... in short it sounded like a fabulous time.

Sadly it was in the UK...

....and I am not...sigh.

So in a desperate effort to participate on some level I painted up a figure and shipped it off to jolly old England so that it could compete in the Golden Gobo contest at the event in my stead.  Thankfully Thantsants was kind enough to act as caretaker and transporter of my figure to and from the event.  I received the figure back from his trip to the olde world a couple of weeks ago but have only now had the time to take quality pictures.

I chose to paint the, to my mind, iconic wood elf wardancer Glam who was sold as the Champion to the ubiquitous Skarloc's Wood Elf Archers RoR.  As you know my heart lies with the dwarfy species of the Warhammer world...both Chaos and otherwise.  So the choice of a Wood Elf for this contest was a bit of a stretch for me...in fact I don't know that I had EVER painted an elf before this one...but I have to say that I thoroughly enjoyed painting this figure and can't wait for the excuse to paint a few more like him.  Jess Goodwin's talents as a sculptor are very well represented in this figure and have really captured my imagination.

...anyway...here is the final product.  Below you will find a discussion of how he got to this point.


Alright...lets step back to the beginning.  Here we have Glam in nothing more than his Dark Gray primer and with a base color of VMC Chocolate Brown (872) applied to areas that would end up being gold, wood or leather.


Here he is with most of the base colors in place.  For the skin I base coated with the old GW Foundation Paint Tallarn Flesh with a bit of brown mixed in.  The hair is Vallejo Panzer Aces Light Rust (301). Glam's Pants are another military color...VMC German Fieldgrey (830).


I highlighted the pants by adding Citadel Foundation Dheneb Stone to the Fieldgrey...I highlighted it up pretty far......too far in fact...

Glam was wearing a pair of faded out Dockers...sigh...(luckily I didn't take a picture of this travesty) So... in a bid to save this situation I quickly gave the pants a coat of heavily watered down Reaper Green Ink mixed with Delvan Mud.  This seemed to even the pants out a little and brought some green back into the cloth.  Crisis averted! 

I find that the Reaper inks are quite glossy as you can see in places where it pooled like at his ankle cuff.  While this annoys me, and looks weird, I try to remember that the matte varnish at the end will even all that out.


Highlighting of the flesh continues by adding Dheneb Stone to the base coat color


And more Deneb Stone is added to the flesh.  The hair was highlighted by adding a rich yellow to the Light Rust base color...I would tell you what that yellow was called...but it was months ago and I don't remember...:)


Next I got some base colors on the metal portions (Bolt Gun Metal, ancient Armory Gold Paint) and finally added some off white to his teeth and eye balls... that helped him seem a bit more life like. I also started to pick out some of the finer detail like the fletchings on the arrows and the scabbard for his dagger. 

Note here that I painted the Oval decorations on his "belt" and wrist guards black.  I had originally thought to paint them metal but at this point I decided that they should look like gems...so I went with the black base color.


From that black base coat I highlighted the gems up through grey colors to bright white...remembering that that the shading of a gem is backwards from normal shading....the light actually collects at the bottom of gems instead of on the the top. 


(In hindsight I probably should have gone a little heavier with this highlighting to make the gems a bit brighter but I'm still happy with the result.)

....at this point you're saying  "Hey Blue....why are your gems grey scale?!?!"

...good question.

....this is where the Tamiya Clear Red (X-27) comes in....this is a neat product that is available in a  number of different colors and is great for getting realistic and quick gem effects with little effort.


A fairly heavy "drop" of this was applied to each of the "gems" making sure to cover the entire surface  Since this paint is clear, the greyscale shading shows through the glossy red coating and and provides for realistic gems with minimal hassle. 

Please keep in mind that this is a solvent based paint...this is not your friendly acrylic paint.  Use a throw away brush (I know you have some kicking around too...from the looks of my painting desk I think I have every brush I've ever owned since I starting painting in the 80's!)  Also...Don't try to clean your brush in your regular water mug....you'll just get your mug all gummy.  And for God's sake keep that paint brush out of your mouth! :)


After the gems all I did was add the pupils to his eyes...highlight and wash the Gold and Silver portions.... matte varnish everything (except the gems!) and then applied my normal basing technique.

There is one part of this model that seems "not finished" ...and I would like to have your thoughts on ...I need ideas on some sort of decoration for the scabbard of his dagger...right now its just yellow...and flat....and begging for some sort of freehand... 

I suck at freehand...particularly on something this small!

...I tried a few things and they just came out looking sloppy... but I'm willing to try again!

If anyone can suggest some examples of simple, elfish, looking designs (line art?) that might be appropriate here I would love to hear about them.

All in all its was great fun to paint this guy up and to have him represent me at the Oldhammer Day...I certainly look forward to painting up some more Goodwin Elves in the future...(those Mounted Personality figures are high on the list!)

Thanks for watching!

Cheers,

Blue

Tuesday, June 11, 2013

LPL Round 8: Remember the Alamo!

So...For Round 8 of the LPL I was forced to recycle a team....this was a tough decision...this was the first rerun team I've had to use in the last 3 LPLs...sigh.  There was no avoiding it.

In order to try and freshen it up a bit...I finished the bases and took some new "studio" photos.  Once again just wonderful miniatures...please check out the Boot Hill website it is full of wonderful minis.


Cheers,

Blue

Saturday, May 18, 2013

LPL Round 5: "They Just Keep Coming!!!"

Hello everyone!  Just a quick post today to keep you all up to date on my 2013 LPL Run.  This week marked the middle point of this years contest....and the pressure is already starting to get to me....well the pressure and my schedule! 

Anyway...more on that later....back to the shiny bits. 

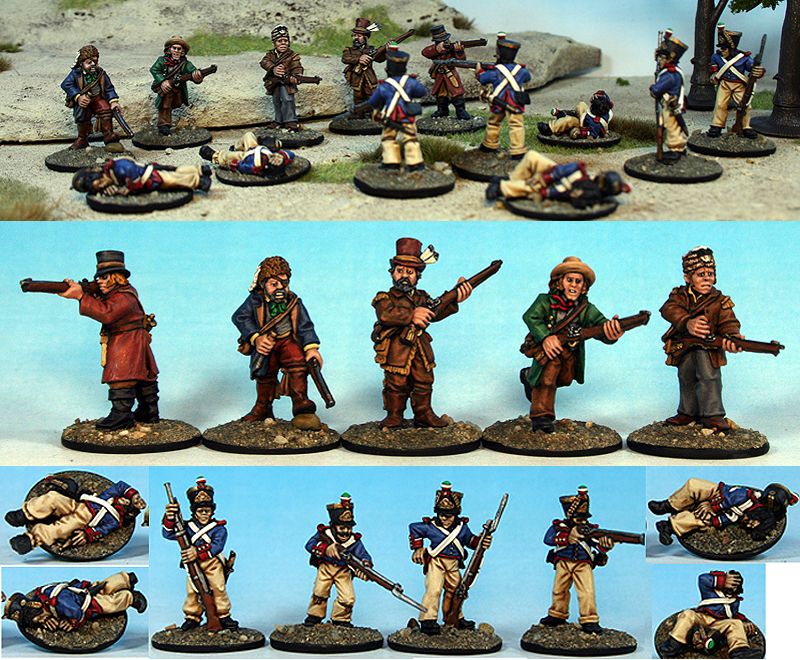
Besides being the mid-point of the contest, Week 5 also ushered in another of the themed rounds...this time the topic was: Civil War.  When this topic was announced I immediately starting thinking about teams....and I came to the conclusion that I didn't have any figures that could fit this theme.  So that my mind quickly turned to thinking about what historical figures I've seen in the past that I've been itching to paint... and that fit the theme...I quickly settled on the Boot Hill Miniatures Alamo defenders and their excellent Mexican Army figures. 

....a brief digression...
"Was the Texas Revolution a 'Civil War'" you ask? well... that's a question for another time...but I would argue yes...uprisings that succeed are called "Revolutions" but hey still represent a country divided and in open conflict with itself...just like a "Civil War"  Anyway....the kind judges at the LPL agreed that it fit the bill so off I went!

....and now back to you regular programming...

I had really enjoyed seeing the greens of these figures posted by Malamute over on the LPL more than a year ago...here was the perfect excuse to buy and paint a couple of packs.  So off to the the interwebs I went...and soon 4 packs of minis were winging their way across the Atlantic to me (thanks Nick!).

Once in hand the figures did not fail to impress.  Both the fantastic Tennesseans and the Mexican troops are extremely clean sculpts and castings with tons of character, I could tell they were going to be a joy to paint.  Both packs are a perfect mix of historical accuracy and a little Hollywood thrown in for good measure. 

This being a themed round I had at least 10 figures to paint so I prompt cleaned, primed, and got to work! 

Work and life obligations kept painting time to a minimum all week... so I was up till at least 3am on Friday getting thing to a point where I could take a picture and get it sent in....as you can see I didn't quite get the bases done....sigh.  For now I'll just post up my submissionn picture....but you can expect more detailed photos of each figure when I have a chance to get them properly based and re-photographed.


I really enjoyed painting all of these...and though this is not an era I'm really interested in gaming...I see more of these finding their way to my collection and my painting table....

...maybe a diorama...?!

Cheers for now!

Blue

Saturday, February 9, 2013

Brush Slave II Entry...Batch Painting Continues!

Hello all,

As I am still in the midst of my batch painting madness I didn't come up with anything really original for this Brush Slave Entry but rather pulled three of my partially painted figures out of the batch and finished them off for the contest.

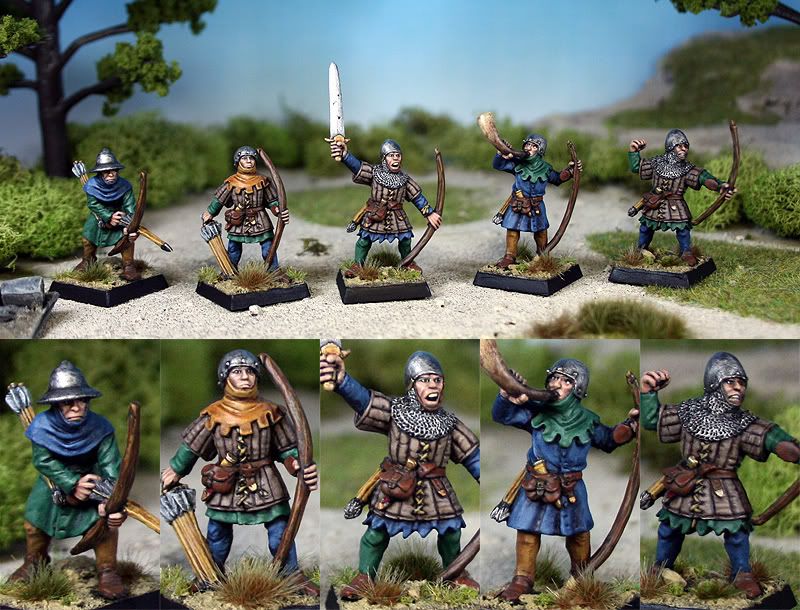
As you will recall I'm currently working through a group of about 35 figures that comprise a good chunk of the missile troops from my Bretonian based force...including a group of Squires with Bows, Mounted Squires and  Armored Bowmen.  I painted up a group of the Bowmen as one of my entries for the LPL last year and I've been using their color scheme as the basis for the scheme for my entire force...lets take a look at them...

As you can see their uniforms are based on a fairly dark blue and a deep green with a tertiary color for their unit...in this case a tan/yellow.  I will try to continue the blue and green theme across all the non-knight units of this force...but I will try to vary the Tertiary color with each unit.

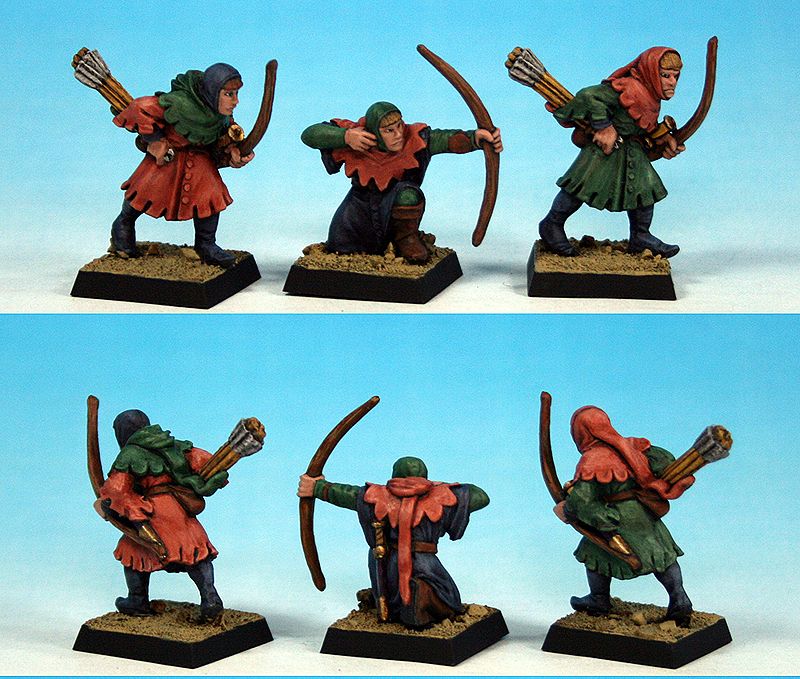
So...for the unit of Squires with Bows...which in my army will be the scouts...I chose to try a burnt orange color as their unit specific color.  As I have not worked with orange a huge amount I saw the Brush Slave deadline as a chance to crank through three figures with this color scheme allowing me to iron out the wrinkles with the color before I tried it with the other 15 figures.

And here are the results...


Not bad...the Orange is Ok...I think they will look better en mass than as a small group like this.

Overall the Batch painting is going very well and I'm making progress on this group.  At this point I have all the base colors on all the figures...and all flesh tones have been highlighted to completion.  Next I will knock out the highlights on the blue and green on all the figures.  Then I will break the big batch into smaller groups for each of the respective units to complete their tertiary color highlights and the fiddly bits on each figure.  Basing I may do as a bog batch again at the end. 

I am certainly seeing the efficiencies in this type of painting as I've gotten a lot of figures a lot further along in a relatively short amount of time compared to when I was painting 3-4 at a time.  Its does get tedious painting one color all night...but not enough to make me stop...when I have a couple of complete units at the end of it it will all have been worth it.

I would love to show a picture of the progress but I'm planning on using some of these figures as entries in future painting contests...many of which forbid showing figures before they "compete"  So once I narrow down which ones will be competitors in the future I'll show the "bench warmers" as examples of my progress.

Cheers for now!

Blue

Friday, October 12, 2012

Its not easy...being Green...

For the first iteration of the Golden Gobo Painting contest that us fans of Oldhammer have participated in I had to really do some soul searching to pick a suitable figure.  This is a somewhat unique contest in that not only did participants have to paint up an Old School figure but we had to create a stat line and background story for our character.  This made the contest quite fun and proved to be a challenge for me as I'm not the best and coming up with "fluff" for my figures or armies....but I gave it a go.

As I ruminated on my figure choice I kept coming around to one of my absolute favorite Marauder Goblin Sculpts....an uncatalogued Goblin Mage.  I had painted a version of this figure back in the late 80's and he served my evil armies well on many a battlefield.  Luckily I liked this figure so much that I managed to hold onto him for all these years...and I can even share it with you...here he is in all his late 80's glory!

haha...as you can see at the time I was fully on-board with the Green base edge and the neon green Goblin skin that was so popular in the 3rd edition...but despite that you can see that this is a VERY cool figure that just oozes character...love this guy.  In fact other than the skin color I like my color choices for his robes...and kept them for the new version I painted for the Golden Gobo.

In a trade on Frother's late last year I stumbled into another copy of this great figure....so I didn't even have to strip this guy down to paint a new version for the GG.  Here is my new version of the figure...I call him Darnog the Dank.


So...I've toned the skin down a bit and given him Dark grey sleeves instead of all blue...and WOW...looking at them next to each other you can really see the value of decent basing...so much better!

Once the painting was done I started to think about the Fluff for Darnog...first I came up with a Stat line for him and a short background.  Once the juices were flowing I also cranked out a brief story describing how Darnog came to posses his powerful protective magic item. 

I should note here that the place names used in the background and narrative are not ones you will find on any map of the Old World...but are of my own creation...and will be more fleshed out as I continue to work on a campaign to play with my local crew...hopefully over the coming winter.

DARNOG the DANK Level 20 Goblin Wizard

Stats
M   WS   BS   S   T   W   I   A    Ld    Int    Cl     Wp
4       4      4    4    4    4   4   1    7+2  8+3  7+2   8+3

Equipment
Darnog is unarmored and carries only a staff as a hand weapon. He is, however, equipped with a Bracer of Protection which gives him a saving throw of 4+.

Background
It is rumored that Darnog the Dank was spawned in the depths of the eastern Grimwald…the great forest to the north of the city of Culhaven. Reportedly his magical abilities manifested themselves early and he is said to have had considerable control of them even at an early age. Some say that he consumed the rest of his littermates…and some say even his parents.

He first became known to the men and dwarfs of the region when his tribe was instrumental in the destruction of a relief column of troops from Finhoff marching to break the siege of Culhaven in 2367CE by the army of Larlog Kahn. Rumors of the hideous experiments carried out on captives of this column by Darnog did not take long to reach the council chambers of Culhaven where vengeance was sworn. When Larlog’s army was later destroyed by a coalition force of troops from Culhaven and Woodelves from the western portions of the Grimwald, it was hoped that Darnog had fallen in battle. But his Dark magics have been reported as instrumental in a number of other actions since then…though no credible witnesses have survived to report it with any certainty.

The few firsthand accounts that do exist from individuals who have encountered this powerful goblin all mention the pungent odor that seems to permeate from him. It is as if he has absorbed the very essence of the deep, dark, wet forest into his being. Perhaps it is through some twisted form of primal connection with the forest around him that has allowed such a debased being as this goblin to achieve such unheard of power. The most recent reports have placed him with a small but growing band of goblin raiders on the fringes of the Grimwald where they meet the Blighted Hills which also includes the notorious unit Skliff’s Shootas. His destruction is still of the highest priority for the city councilors and residents of Culhaven.

Narative
Erich watched in bewildered fascination as the goblins swarmed over his wagon load of good and his dying horses. It reminded the trader from Culhaven of a pack of five year olds let loose on a pile of sweet meats. Squabbles erupted over particularly shinny bits of loot, distracted goblins walked into each other or tripped over tidbits of gear that were strewn about….and the Noise! It was an endless din of gibberish mixed with squeals of delight, as treasures were discovered, and grunted curses of anger as they were snatched away by another greenskin.

His fascination was broken by the scream of Pie Eye as a goblin repeatedly stabbed the wounded horse in the neck…attempting to finish the poor mare off. Erich cursed between clenched teeth as the goblins began cutting chunks of the animal off before she was even dead. Occasionally one of the vermin would throw a glance at Erich…he knew his time would come before too long…but for now they seemed content with rifling through his belongings. They had caught him off guard, half asleep on a hot summer day driving his wagon through the dense woods north of Culhaven. This road was supposedly safe but the dense woods in this part of the province were occasionally infested with groups of greenskins, he should not have been traveling alone…but guards were expensive and profits were slim. If he somehow escaped this nightmare he would personally volunteer to lead a force of retribution to rid the wood of this foul group.


After another ten minutes of rooting through his wagon load of trade goods, and stripping his team nearly to the bone, a group of five of the larger goblins turned their attention to the trader who lay trussed like a hog at the edge of the forest. As the group ambled over to him, Erich tried to shake the sleeve of his tunic down over the thick gold bracer that was fitted tightly around his left arm. Sadly the motion seemed to attract attention to the only valuable piece of equipment that Erich actually owned.


“Wots dis den eh? Got a bobble der do ya?” the largest of the filthy figures barked at Erich. When he failed to answer the goblin went on “Gif it ‘ere or I’ll stick ya good” he said as he pulled the long curved blade knife from his belt. The cruel looking blade was still sticky red with horse blood.


The goblin’s feeble mind failed to understand that with the fetters they had secured him with he couldn’t possibly comply…even if he wanted to…so again he kept his silence.
 

“fine den…its da ‘ard way den is it?” the goblin spat, glancing at his neighbors to insure that they would back him up.

“ya Skliff…the ‘ard way it is..I’s like the ‘ard way” one of the others muttered, his face twisted into a cruel smile… and they moved to pin the merchant to the ground by piling on top of him. The one apparently known as Skiff pulled his bound hands out in front of him and knelt on Erich’s elbows. The pain was intense but he knew worse was to come.


“right den…lets git to it den..dat bobble gonna look right nice on me own ‘and” Skliff growled as he brought the knife down to severe Erich’s forearm just above the bracer.


The bracer that had saved his Erich’s life innumerable times was about to become the end of it as well. It had been a gift from his uncle Heinrich on his deathbed. The old man swore it had some charm that had kept him safe during his years with the mercenary outfit he had spent his youth serving with, and Erich had no reason to doubt him. In many bar room brawls, scrapes with highwaymen, and that unfortunate incident during the Brewery Riots, Erich had emerged unscathed and he could only attribute that to the “charm” of his uncle’s gift.


It was just as the knife was about to cut into his arm that Erich became aware of the smell. Not the rancid body odor smell of the filthy goblin who was kneeling on his arms, but a wetter, mustier, earthy smell that suddenly seemed to fill the air around them. At first Erich could not locate the source of the smell…not until he heard the loud crack of wood on skull and Skliff suddenly pitched to the side…out cold…could the trader determine its origin. Looming over him…filling the space above him where Skliff had knelt…was an ancient Goblin dressed in heavy dark blue and grey robes…a gnarled wooden staff clenched in his wrinkly hands. His face was slack and expressionless, but his eyes glowed red with pure malevolence. As the rest of the Goblins holding Erich down backed away, giving way entirely before newcomer he heard several of them mutter the name “Darnog.”


Even though he was no longer restrained by the pile of goblins that had been sitting on him, Erich was frozen in place by some unearthly power. It was as if the gaze of Darnog alone had the power to hold him motionless. As the wrinkled green skin stepped up to stand directly over him, Erich now knew where the wet musty smell that permeated the air was coming from…this was Darnog the Dank…a powerful goblin wizard and scourge of the Eastern Marches. Erich’s bowels suddenly turned to water and it was all he could do to keep from soiling himself. Where before he had considered escape an actual possibility he now knew that a quick death would be the best he could hope for. Darnog's reputation was well known to all...


Darnog seemed to sniff the air around the merchant…and his gaze suddenly shifted from Erich’s eyes to the golden bracer on his arm…and there it lingered for a long second. With careful precision Darnog brought the end of his staff up and gently tapped the bracer twice. Immediately the ornament sprung open in a way that Erich had not even known was possible. Darnog bent over slowly and pulled the bracer free of Erich’s frozen arm…and as he straightened the wizard fastened it around his own forearm. Without so much as a word Darnog turned and walked away…taking Erich’s last hope with him.


Once it was clear that the grizzled goblin was done with him, the remaining greenskins closed in on the hapless trader…No Charm would protect him now...


Well there it is...I hoped you enjoyed the story.

Cheers,

Blue

Tuesday, September 6, 2011

My Basing "System"

Hello All!

Over the last couple of months a few people have asked me how I base my figures…so while I was working on my entry for the painting contest over at Warhammer-Empire I remembered to take some pictures of the process.  Please note that some of these pictures were taken on my wife’s iPhone so are not of the highest quality…but I think they are good enough for this walk through.  If you have questions please let me know.

Until a year ago I had only based a handful of figures…Ever.  Thanks to the encouragement of Bugman’s members like Jimmytrout and CDO member Clam who liked the painting I was doing on figures but pointed out that they were not really “done” until they were properly based I was finally motivated to figure out a basing style for my figures.  I wanted a system that was fairly quick, not too elaborate, and appropriate for gaming figures…which I consider all my figures…even though I haven’t had a game in 15 years!  After a thorough search of the web for walk-through and tutorials I settled on my system.  It is outlined below.

The Victim:
For this walk through I will be using this recently completed Marauder Empire Champion (one of my favorite Empire figures EVER).  I chose him because he has a fairly open base that will allow me to demonstrate my technique easily…and I needed to finish him for the contest anyway…


STEP 1: Sand the Base
The first thing I do with my bases is to cover them with sand.  To achieve this goal I first apply White Glue (PVA)…typically Elmer’s…using a coffee stir stick.  Put a fairly thick layer on the entire surface of the base…but try not to get any on the feet of the figure.


For sand I use some that I stole from my kids sand box….it has a good mix of grain sizes.


Take the figure and ”dip” the bases into the sand…making sure that grit gets on all the glue.


Lift it out of the sand and tip it to the side…tap it with your figure to shake off the excess sand.


Then set him aside and let the glue dry…here is the sanded base


STEP 2: Paint the Base
Now that the base has texture its time to get some color on it.  I will be using these two colors on my base.  They are Vallejo Model Colors Paints…the one on the left I believe is called Khaki (but as you can see its not labeled) the one on the right is 976 Buff.


To start with I thin the Khaki with a bit of water and paint it onto the base with a fairly thick layer.


This is followed by a heavy wash of GW Delvan Mud


Once that is dry I drybrush the whole base with straight Khaki…this is a heavy drybrush…just leaving the wash in the deeper recesses.


I follow this with a lighter drybrush of 50% Buff and 50% khaki


NOTE: with my Chaos Dwarfs and their allies…I use straight Buff for this second Drybrush…it gives a more “Arid” feel to the base.  Adjust your colors as needed to fit your armies “theme.”


STEP 3: Add Vegetation
For dessert based armies you could stop at this point…but even a few pieces of grass, or a tuft or two can really make a base look sharp.  Here is how I do it.
I start with placing some greenery in to the recesses around the larger pieces of sand on the base…these represent small plants that have found some shelter in and around larger rocks.  For this I use Gale Force 9’s  “Spring Undergrowth” flock blend


I put a small drop of White Glue into these spaces with my stir stick then use tweezers to place the flock into the glue drop.  These are very small pieces of flock….that container should last me through about 5 armies at the rate I use it.  But its one of those things that if you skipped this step you would miss them in the final result…despite their small size.


Next I place several small Tufts around the base.  There are now several brands of pre-made tufts available to the hobbyist…the ones I use are by Silflor and I am very happy with them.  They are available in the US from Scenery Express: http://www.sceneryex...s.asp?dept=1217 In Europe I would get them from Antenocitis Workshop: www.antenocitisworkshop.com  I suggest buying the large packet of your chosen color because it comes with enough tufts in both 4mm and 6mm to do a whole medium sized army…and they are super easy to use.

NOTE: these are the same tufts sold under the Army Painter brand…AP buys them in bulk and cuts them down into those tiny packages they sell and doubles the price!  Buy the Bulk packs from one of the folks listed above and you will get WAY more tufts for your money…plus AP tufts only come in 6mm which is too big for many 20mm bases.

Here are the sheets of tufts I used for this figure In the back are 2 sheets of 4mm tufts in green and brown.  In the front is a small sheet of 6mm tufts.


These are picked off their backing sheet with tweezers…the bottom of the tuft is dipped lightly into the PVA and placed into relatively flat spots on the base.


I typically put 2-4 tufts on a base…mixing the colors as I feel the need.  Don’t get too carried away with the tufts…I’ve found that with basing “Less is More”…In my mind the base is there to accentuate the model…not overpower it…but again I digress…  With 20mm bases I typically use mostly the 4mm tufts…I squeezed one 6mm tuft on the backside of this figure.  You have much more ability to use the large tufts with 25mm (and up) bases.

Here is the base with tufts in place…glue still wet


The final Foliage I put on my bases are small patches of static grass.  I use a mix of Gale Force 9 Static Grasses…in roughly equal proportions…Green Grass and Dead/Winter Grass…I’ve taken an old film canister and filled it with my custom mix…it will last for many…many figures…


To place the static Grass I put a couple of patches of glue directly onto the base…


…Then drop a heap of mixed Grass onto the glue.


Don’t be shy…get some on there!


Set that aside for 1-2 minutes and allow the glue to tack up and grab onto the grass…then tap off the excess grass that isn’t stuck in the glue (much like we did for the sand earlier).  At this point I often blow on the patches as well…this causes other loose grass to come off as well as causing the grass that is staying to stand up a bit better.


The final step in the process involves removing unwanted blades of grass from the base.  Once the glue is dry I use my best tweezers to pull off pieces of the static grass or tufts that are too tall, touching the figure, hanging off the base, going in the wrong directions etc…etc…  Now don’t get to carried away here…just pick off the ones that annoy your sense of “style”…again this is a really easy step to skip but makes a big difference in the overall feel of the base…IMO…YMMV.

STEP 4: Take some Decent Pictures
Here is the final product:


I hope this is helpful for others who are reluctant to base their figures….this system is fairly fast…quite cheap when the cost is spread out over the many dozens of figures these supplies will complete…and quite easy…If I can do it…you can too!

Cheers,

Blue