Once again the busy summer has gotten the better of me for the past couple of weeks and hobby time has been practically nil. However...this past weekend my wife was away and though I was home alone with the two nibblers I had my evenings to myself....so I actually got something done!
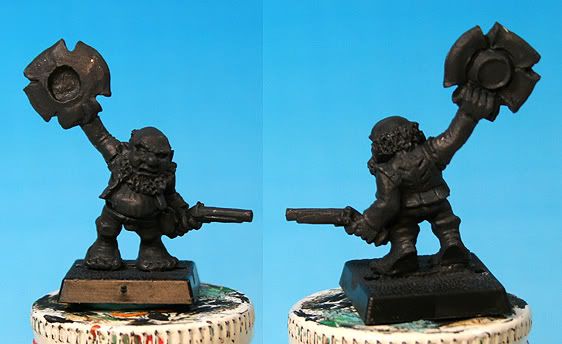
The theme for the July Painting Challenge on Bugman's Brewery is "Shooty Dwarf"....basically any dwarf with a missile weapon. Recently I acquired a perfect dwarf for this theme (thanks Iain!)...one of the much sought after MM15 dwarfs...the one I tend to call the "hat waver" As he is holding a pistol I thought he would be a good subject for this challenge. I also decided that this would be a fun figure to try and do a walk through of my painting process. Clam has been hounding me for months to do a thorough description of my painting sequence for Blue...and, just to show I could, I decided to go ahead and do a full walk through of all the colors.
Let me start by saying that I certainly don't think that my methods of figure painting are the only way to paint...in fact I think this process will show just how horribly inefficient my painting system is...:) But people have asked how I achieve certain colors on my figures so I happy to offer whatever info I can...so here goes.
For the last year or so I've been priming my figures with Dark Gray Auto Primer...and have been very happy with the speed of priming and the quality of the painting surface...so here is our figure after priming
Now, I have an odd approach to figure painting...I like to get all the base colors on my figure first so I have a mental idea of where the figure is heading....before I do any highlighting.
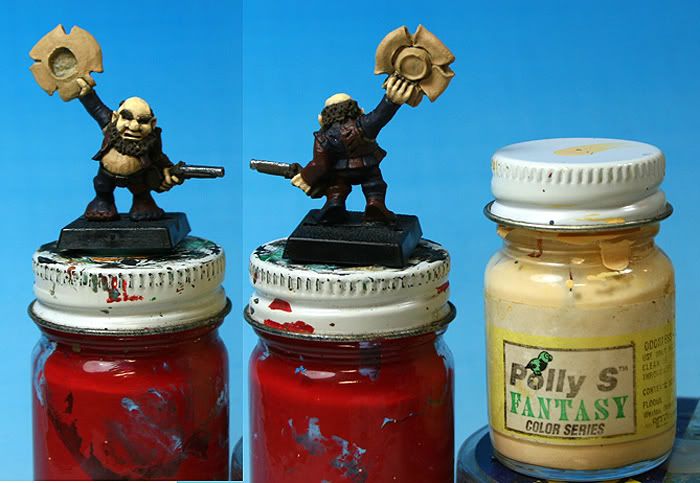
I started with getting the base color on the flesh areas...basically the face/head and the hands on this figure. My flesh recipe is based on a now OOP paint from PollyS Paints Fantasy Series called "Canine Yellow Brown"

For the areas that would end up being white (Shirt and Hat) I used a mix of the "Canine Yellow Brown" and Vallejo Model Color (VMC) "Buff" (976)...the VMC has a much higher pigment load per volume than the PollyS paints so this is a 75-25% mix.

For the base color for the blue area I use a Ral Partha Dark Blue that I have had for 20+ years...I don't even remember what its called...but you can see it in the picture and get an idea of how dark it is....its DARK...so dark that you can't even really tell where I base coated with it!

Sadly the PollyS paint that I typically use as the base layer for red areas (Dark Red Brown) dried up unexpectedly over the last two weeks...sigh...so I had to make this up on the fly...I chose to mix VMC Red (926) with VMC Chocolate Brown (872)..about a 50-50% mix.

That covers the majority of the figure...but there are some details left to base coat...mainly the beard-hair eyebrows, belt and bag, pistol stock, and pistol barrel. The barrel gets a coat of GW Bolt Gun metal...again a very old paint so I can't guarantee that it is the same as the current GW paint offerings. All of the other things listed will end up different shades of tan...or Brown...or Gold. For all of these areas I use the same base color VMC Chocolate Brown (872).

So...now the base colors are in place on the entire figure...all that's left to do is highlight them up to the point I like. I'll go ahead and walk through the skin tone series in this post and save the rest for later posts.
Alright...first Skin tone highlight consists of 75% Canine Yellow Brown and 25% PolyS Flesh. As least 2 coats of this color.

Next layer is just the opposite 25% Canine Yellow Brown and 75% Flesh

And the final layer is just straight Flesh. This paint is particularly thin so there are 3-4 coats in areas where the highlight need to be the strongest. Remember that all paints are only partially opaque...more layers=richer color and better coverage...pretty much every color I use gets at least two coats.
This highlight looks very over-exposed in this picture but will look better as the rest of the colors are also brought up a few levels.
Ok...that's enough for now...I don't want to completely overload you with pictures in one post...so...more to come soon.
Cheers,
Blue
Great tutorial so far!
ReplyDeleteI tend to block in all the base colours too - you're not alone ;)
Gives you an idea where you're heading as you say, but it also gets rid of all the more hundrum legwork in my opinion, leaving you to play around with highlights and other fancy stuff.
Great tutorial. It's always good to see the work that goes in to get the final results!
ReplyDelete