Tuesday, July 31, 2012

MM15 Painting Walkthrough Part 5

Despite having the figure finished and ready for basing with plenty of time before the due date for the Bugman's contest....I still had to rush to get the final pictures in!  Life has really kicked my ass this summer...and looking at my work schedule the rest of summer and fall aren't going to be much better.  Ok well...now that I have vented a little let's turn to the reason for this post....the pictures!!!

For basing this figure i used the same same system that is outlined in an earlier post on this blog...look at the labels over there on the side and click on the one called "basing tutorial" and you'll see all my tricks.

Anyway here are a few views of the finished project


And here he is with a few of his mates...


Alright...now time to get down to work on my Greatswords for the Bugman's unit contest....only 16 days left to get them all done!

Cheers,

Blue

Thursday, July 26, 2012

MM15 Painting Walk Through Part 4

Alright!  Time to get this guy finished.  As I'm sure you will remember at the end of the last post all that remained to do was the beard and the other fiddly bits.  So lets get those out of the way...

First the Beard...The base color I used is VMC Chocolate Brown and the first layer of highlight I applied is Reaper Master Series Earth Brown (9029)


The next step add The classic Citadel color Bubonic Brown to the mix...probably 50-50%


And this was followed by straight Bubonic Brown


And finally a bit of VMC Buff (976) was mixed into the Bubonic Brown and sparingly applied to the ends of the beard hairs.


With the Beard done we have the belt/bag and the Pistol left to take care of. The belt and bag were highlighted with a mix of VMC chocolate Brown and Citadel Bestial Brown and then with straight Bestial Brown.  The pistol is highlighted with stripes of bestial brown followed by stripes of PolyS Canine Yellow Brown to simulate wood grain.


Ha...Well you can barely see the difference...but oh well...I took the picture and so you have to look at it! For the metals...I decided to go with a copper color for the pistol furniture.  I chose an old battle of Citadel Dwarf Bronze for these parts.  This was then highlighted with a mix of Dwarf Bronze and Citadel Mithril Silver.  The pistol barrel, which had be base coated with Bolt Gun Metal, was highlighted with Mithril Silver.


Then to tone down the metals a bit I gave them a wash.  The Bronze areas got a Gryphonne Sepia wash and the iron portions got a Badab Black wash


In essence this figure is done...but there are a couple of minor details that need to be dealt with...mainly...this guy needs some eyes.  Now I know many excellent painters who don't bother giving their figures eyes...but with these excellent dwarf sculpts there is plenty of room for eyes and I think it really gives the figure some personality.  I also wanted to add just a small stripe of white in his mouth to suggest some teeth.  I had left the eye socket block from the primer coat so just had to lay down a layer of VMC Offwhite for the white of the eye and s spot of PolyS Night Black for the pupil.  The Offwhite was also used to pick out the teeth.


Here is a close up view so you can actually see what I'm talking about...


I've been playing with my Movie maker software and threw together this short video which pulls all the images I've posted for this walk through into movie form.


 Now all I have left to do is to varnish the figure and complete the base.  This is well underway and I'll put up the finished picture tomorrow.


Cheers,


Blue


Wednesday, July 25, 2012

MM15 Painting Walk Through Part 3

Ok...Lets have a go at Round 3 of the Painting walk through. 

I would like to start by answering a few questions that have come up about the basics of how I paint. 

As you can see from the pictures I mount my figures to old paint pots using Blue-tac...this allows you to rotate and manipulate the figure without actually touching it and thereby potentially damaging the parts that you have already painted.  You must do this!  I'm amazed at how many people still hold onto the the figure itself while painting....don't be one of those people!

I use a wet pallet for mixing my paints.  Mine is a home spun version...I use a shallow airtight rubbermaid container (sandwich size) with two folded paper towels in the bottom which I saturate with water.  Atop this I place a piece of baker's parchment.  This "paper" allows a small amount of water to pass through it into the paint...this slightly thins the paint and keeps it wet...my paint never dries out.  In fact there are times that I can come back to the same blob of paint after 2-3 days and still use it.

For Brushes I am currently using the much revered Windsor and Newton Kolinsky Sable Brushes...sizes 1 and 0.  That said I just ordered a set of the sable/synthetic blend brushes from Rosemary and Co. and look fwd to giving them a try.

I don't go in for wet blending...in fact I'm quite afraid to even give it a try...:)  Most of my painting "skills" were formed before such techniques were developed...I'm an old school painter... as you can tell by the lack of washes in my sequences...and my obnoxious color choices. Basically...I fear change!

I think that answers most of the questions that have come my way...but I'm happy to answer more so please don't hesitate to ask.

Lets get back to work on the figure...I have a fairly short update for you today which will cover the blue sequence.

As previously mentioned, I base coated the blue areas with an old Ral Partha paint...I'm not sure what it was actually called but it is a very dark blue.  The next step involves adding about 25% PolyS Dragon Blue.  This is my all time favorite blue paint...luckily I bought up a couple of bottles before it went out of production so my supply should last through the rest of my Puff and Slash army.


Next I reverse my formula and use 75% Dragon Blue and 25% Dark Blue


And then a highlight of straight Dragon Blue

 This is looking pretty good....but to make the Blue really "pop" you still need to take it up a level or two higher. So I start mixing in some VMC Offwhite (820)....just a little bit at first...


 ...and then just a little bit more for the very highest points of the blue areas.

 Perfect! now this is really starting to look like he will fit with the rest of my army. 


Sadly this tutorial has now caught up with my painting...:-( so I'll put in a bit of time tonight and try to get this guy wrapped up in the next post.  All I have left to do is his beard...belt...bag...and pistol...base.  And of course...the ever troubling eyes.


Cheers for now!


Blue

Tuesday, July 24, 2012

MM15 Painting Walk Through Part 2

Welcome to the second installment of my figure painting walk through.

To this point I've gotten base colors blocked in on all portions of the figure and highlighted the flesh tones up through 4 levels.  Now I will switch my attention to the larger blocks of color...starting with the white elements. (Please remember to click on the images for a larger picture)


If you will recall the "white" areas were base coated with a mix of VMC Buff (976) and PollyS Canine Yellow Brown.  For the next step I go with straight Buff.


These areas were then washed with Citadel Gryphonne Sepia...being careful not to allow it to run into areas that I don't want to shade....like the rest of the model!


I then go back and re-highlight with Buff again


Now its time to start bringing this up towards pure white.  The next step involves a layer that is a mix of Buff and VMC Off-White (820).  And then a coat of pure Off-White...which I forgot to take a picture of...sigh...I was doing so well!


...and finally a coat of pure white on the very "highest" portions and along the raised edges of the hat and shirt.  My white is another of the artifacts from my youth...a bottle of PollyS Dragon White.


Now that the white is out of the way I'll move onto the red sequence.  Once again to back track abit...the base color for the red areas is a mix of two VMC paints...Red and Chocolate Brown.  For the second highlight of the Red areas I used straight VMC Red (926). (note this layer was applied, and this picture taken, while I was waiting for the wash to dry on the white areas...hence the discrepancy with the white portions in this photo)


At this point I mixed 25% VMC Flat Red (957) into into the VMC Red and highlighted with that.


For the next layer I reversed my formula to 25% VMC Red (926) and 75% VMC Flat Red (957).


And for the final layer...straight Flat Red (957).  Remember that Red paint in particular does not cover very well so...once again...more layers!  Yes...MORE LAYERS...with the top coat I used at least 4 layers.


Alright...that brings us to a good stopping point for this post.  The next post will focus on the Blue areas and the fiddly bits...beard...belt...pistol...and so on.

Cheers,

Blue

Monday, July 23, 2012

MM15 Painting Walk through Part 1

Howdy all...

Once again the busy summer has gotten the better of me for the past couple of weeks and hobby time has been practically nil.  However...this past weekend my wife was away and though I was home alone with the two nibblers I had my evenings to myself....so I actually got something done!

The theme for the July Painting Challenge on Bugman's Brewery is "Shooty Dwarf"....basically any dwarf with a missile weapon.  Recently I acquired a perfect dwarf for this theme (thanks Iain!)...one of the much sought after MM15 dwarfs...the one I tend to call the "hat waver" As he is holding a pistol I thought he would be a good subject for this challenge.  I also decided that this would be a fun figure to try and do a walk through of my painting process.  Clam has been hounding me for months to do a thorough description of my painting sequence for Blue...and, just to show I could, I decided to go ahead and do a full walk through of all the colors.

Let me start by saying that I certainly don't think that my methods of figure painting are the only way to paint...in fact I think this process will show just how horribly inefficient my painting system is...:)  But people have asked how I achieve certain colors on my figures so I happy to offer whatever info I can...so here goes.

For the last year or so I've been priming my figures with Dark Gray Auto Primer...and have been very happy with the speed of priming and the quality of the painting surface...so here is our figure after priming


Now, I have an odd approach to figure painting...I like to get all the base colors on my figure first so I have a mental idea of where the figure is heading....before I do any highlighting.

I started with getting the base color on the flesh areas...basically the face/head and the hands on this figure.  My flesh recipe is based on a now OOP paint from PollyS Paints Fantasy Series called "Canine Yellow Brown"


For the areas that would end up being white (Shirt and Hat) I used a mix of the "Canine Yellow Brown" and Vallejo Model Color (VMC) "Buff" (976)...the VMC has a much higher pigment load per volume than the PollyS paints so this is a 75-25% mix.


For the base color for the blue area I use a Ral Partha Dark Blue that I have had for 20+ years...I don't even remember what its called...but you can see it in the picture and get an idea of how dark it is....its DARK...so dark that you can't even really tell where I base coated with it!


Sadly the PollyS paint that I typically use as the base layer for red areas (Dark Red Brown) dried up unexpectedly over the last two weeks...sigh...so I had to make this up on the fly...I chose to mix VMC Red (926) with VMC Chocolate Brown (872)..about a 50-50% mix.


That covers the majority of the figure...but there are some details left to base coat...mainly the beard-hair eyebrows, belt and bag, pistol stock, and pistol barrel.  The barrel gets a coat of GW Bolt Gun metal...again a very old paint so I can't guarantee that it is the same as the current GW paint offerings.  All of the other things listed will end up different shades of tan...or Brown...or Gold.  For all of these areas I use the same base color VMC Chocolate Brown (872).


So...now the base colors are in place on the entire figure...all that's left to do is highlight them up to the point I like.  I'll go ahead and walk through the skin tone series in this post and save the rest for later posts.

Alright...first Skin tone highlight consists of 75% Canine Yellow Brown and 25% PolyS Flesh.  As least 2 coats of this color.


Next layer is just the opposite 25% Canine Yellow Brown and 75% Flesh


And the final layer is just straight Flesh.  This paint is particularly thin so there are 3-4 coats in areas where the highlight need to be the strongest.  Remember that all paints are only partially opaque...more layers=richer color and better coverage...pretty much every color I use gets at least two coats.


This highlight looks very over-exposed in this picture but will look better as the rest of the colors are also brought up a few levels.

Ok...that's enough for now...I don't want to completely overload you with pictures in one post...so...more to come soon.

Cheers,

Blue

Monday, July 2, 2012

A Return to the Dark side...

Hello All!  sorry for the long time between posts...RL has caught up with me in a large way this summer and painting time has been hard to come by...add to this the general painting exhaustion I've been suffering after the wrap up of the LPL and...lets just say...I haven't gotten any painting done for the better part of a month.

But...when you are in your darkest hours it is often your friends that come through in a pinch.  In this case my good friend Clam came along to get me inspired.  Clam is one of those rare internet friends that you have an immediate connection with...even though they live thousands of miles away and speak another language most of the time.  Clam is always up to something interesting and has wonderful taste in miniatures.  We met over on CDO a couple of years ago and have traded many dozens of PMs since then...None more exciting than one I received about a year ago now.  Clam clued me in to a little project that he was working on with John Pickford to create some new Evil Dwarf figures that would compliment the classic 2nd and 3rd edition Chaos Dwarfs produced by Citadel and Marauder.

The idea sounded like a pipe dream at first...but through Clam's dogged determoination and John Pickford's immese skill this dream has just recently become a reality.  About a month ago Clam let me know that the first Mastercasts of his new babies had been produced and he wondered if I might paint up a few...I of course jumped at the chance to see these top secret babies in person and readily agreed.

A couple of weeks ago a small package arrived from Denmark...where Clam resides...containing 4 bodies, 8 weapons and 10 heads (plus a few other tidbits I'll mention another time).  As my wife can attest...when I got the package after work I immediately retreated to my man cave and she didnt see me until the next morning.  I fiddled with all the heads and body combos...I tried different weapons on each sculpt and generally had a good time.  And within less than 24 hours I had my four Ewal Dvergar built and ready to be primed.

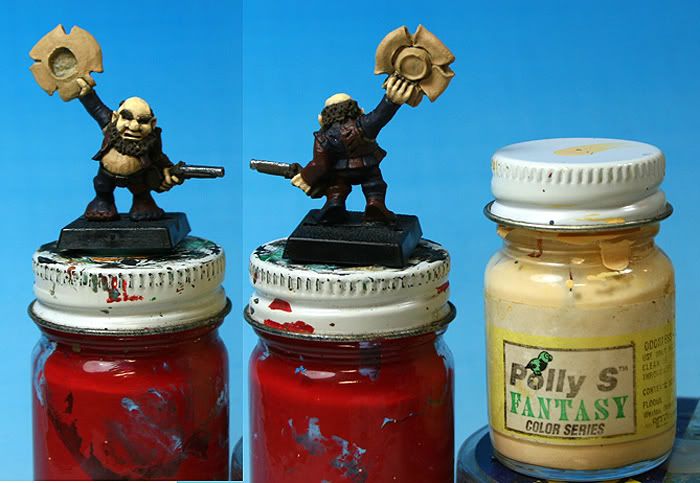
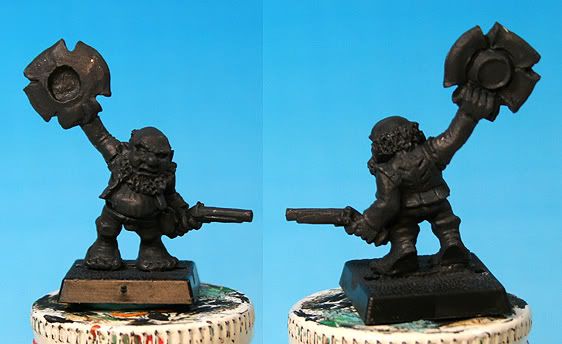
Here they are in their "raw" form


The sculpts are gorgeous and the quality of the casting is fantastic...I had very little in the way of flash or mold lines to remove.  You may spot a couple of bits of greenstuff in this picture...that is there mostly from my botched attempts at pinning the weapon hands to the arms...I apparently need more practice at this task.

Next came the ever delicate task of deciding on a color scheme for each figure.  If you have seen any of my previous posts about Chaos Dwarfs you will know that I'm a fan of the bright colored armor favored in the 3rd edition for my chaos figures.  I've employed this technique on a fair number of Citadel and Marauder MM90s over the years...so I wanted to make sure I didn't duplicate any colors that I had used previously...you can't have your Chaos troops looking too uniform right?! :)

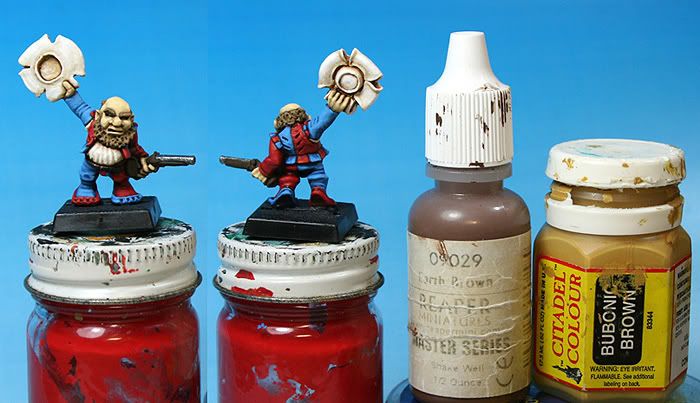
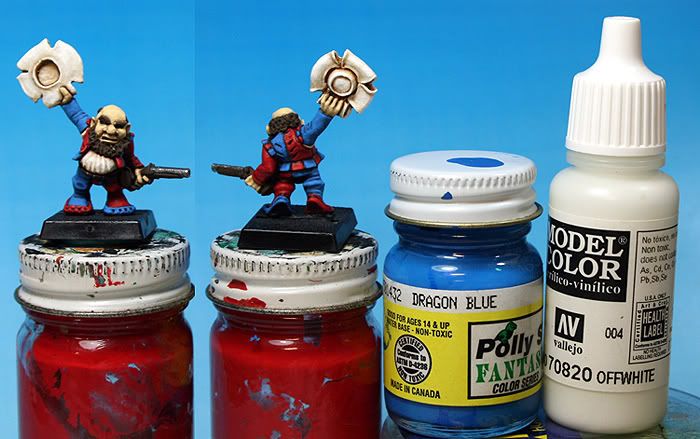
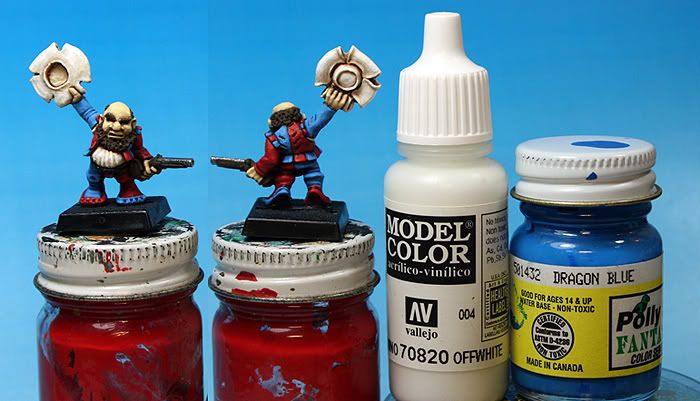
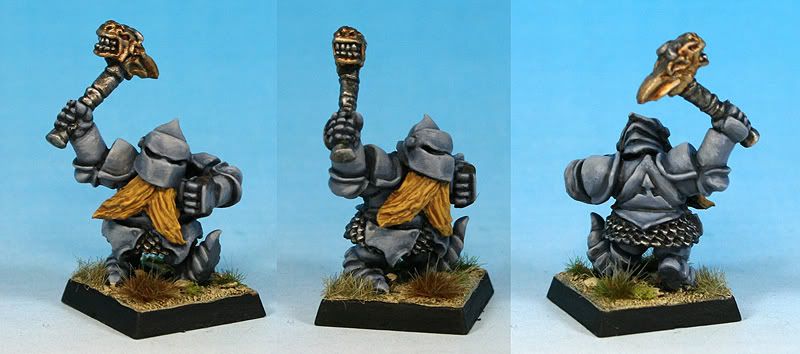
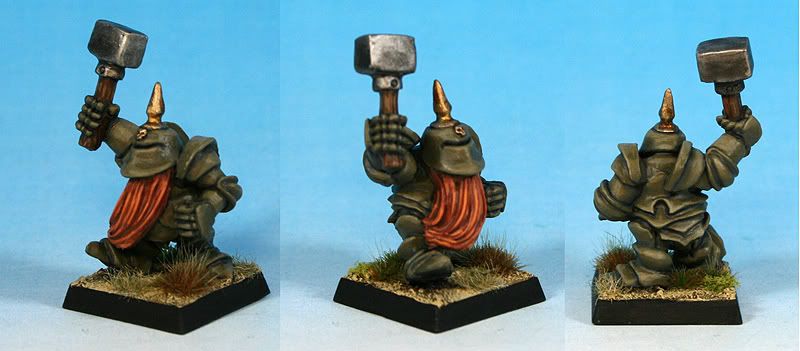
For the guy on the left I was shooting for a Blue-Grey armor color...but as occasionally happens with these things...once I started highlighting the color took a slightly different course than I had originally intended...thankfully it was a course that I'm quite pleased with...to me he looks a lot like a Storm Trooper from Star Wars...except shorter of course...and hairier...:)  The Yellow Beard brings a bit of color and contrast to the finished product.

The Deamon faced hammer this guy is swinging is one of the better weapon options for these figures...its a great detail that really adds some interest to the sculpt as a whole.

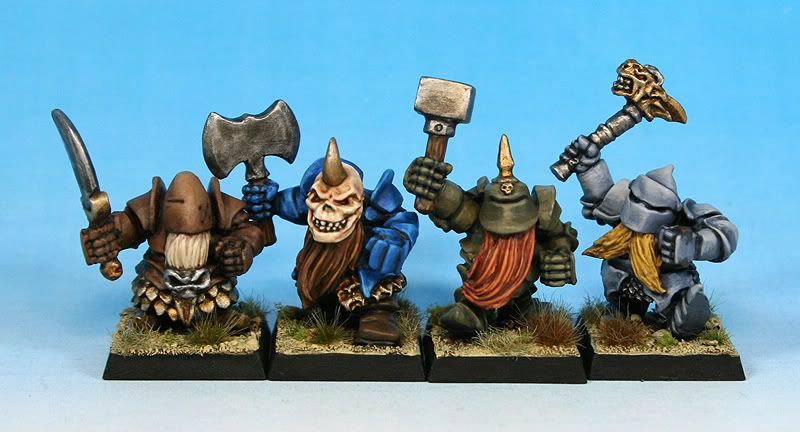
The next one from the left...Mr. Skull face... I really liked right off the bat...I knew the skull was going to be a great focal point for the figure so I choose my signature blue color for his armor as a good contrast to the bone.  As his armor and helmet were so prominent I chose a fairly subdued brown for his beard.


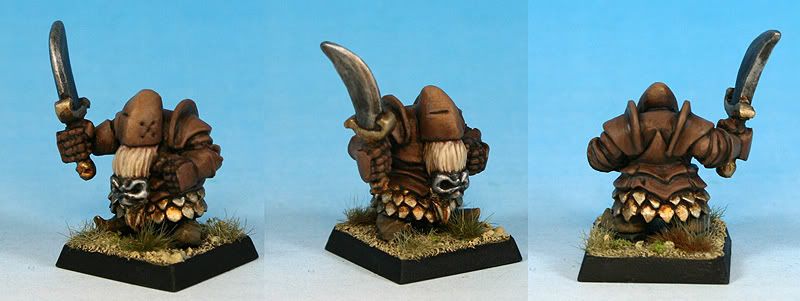
The third figure is the least dynamic pose of the four bodies but makes a perfect base for a rank and file trooper...I really liked the "egg" shaped helmet and though the curved sword he is holding seemed an odd choice it just felt right with this guy and I'm pleased with the result.  Colorwise I went with a more subdued brown.  I had great success with a tan MM90 awhile ago and wanted something similar but with a darker brown color...I was concerned that the gold scale mail would get lost in the brown but after highlighting and washing it I think it contrasts nicely with the plate armor.


Lastly is my favorite of the bunch...the guy with the spiked Helmet.  This figure reminded me of WWI German helmets...which made me think of military colors...which made me think of OD green...which reminded me that Clam has an affinity for green armor...which led me to this color scheme.  Since the Green is fairly subduded I opted for a bright red beard and it really made the figure pop nicely.


All-in-all these are just lovely, character-filled figures.  My only complaint is that I didn't have more bodies to use!!  There are plenty more excellent heads to choose from in this range and I'm itching to give them a go as well.

These figures will be getting shields...they are on the painting table now...I'll be sure to post pictures when they are completed.

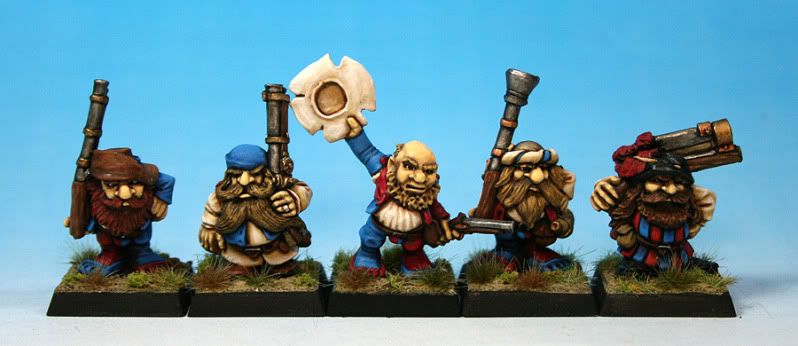
Here they are ranked up...


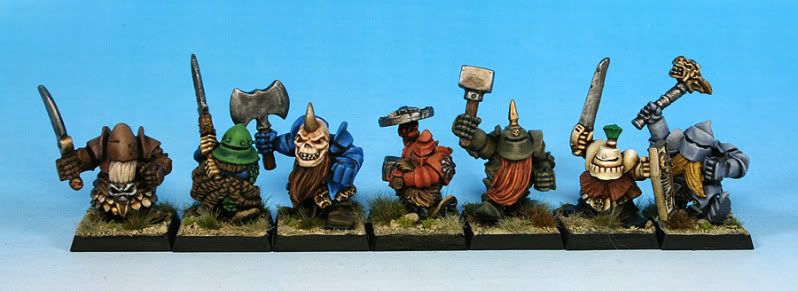
And here they are ranked up with some of my classic Marauder MM90s...I think they are a perfect fit in both size and style.


So if you are now wondering..." How do I get my hands on some of these beauties?"  Well the answer is simple...check out Clam's Blog here: http://claminiatures.blogspot.com/  Right now supplies are limited to the extra master casts that he has but there is hope that these will reach production casting sometime in the near future.  Further discussions with Clam have suggested that this may not be all the sculpts we see from this range either...but I leave that news to the man himself....:)

Excellent work Clam...you sir are a giant amongst chaos twisted, heavily armed, fouls smelling, stunties in colorful plate mail...(which is a good thing...in my eyes anyway! :))

Cheers for now!

Blue