I wanted to take a moment and wish all of my cyber freinds and comapnions a happy and safe holiday season....enjoy yourself and your family during this special time of year. I look forward to sharing more fun figures with you in the future and drooling over all of your posts as well! Thanks for sharing this continuing journey with me.
Here is a piece I did to help me get into the season...Contaminated Santa from Lead Adventure Miniatures.
Cheers to all! see you in the New Year!
Blue
Wednesday, December 21, 2011
Happy Holidays All!
Thursday, December 8, 2011
Chaos...the BIG and the small...Part 3
I've finally had some time to crank out few more of these Chaos Warriors for Hashut's Lil Helper (HlH).
This was an interesting batch...it had its challenges but I'm pretty happy with the results.
First up was good old two swords here...
The blue armor on this guy was achieved by using my standard Gun Metal-to-Silver sequence and then washing with a mixture of Badab Black (GW wash) and an ancient bottle of citadel blue ink that I've had since I was 15 or so...:) This guys horns aren't textured like the ones on his corresponding MM90 so I had to fake it.
Here are the detail shots
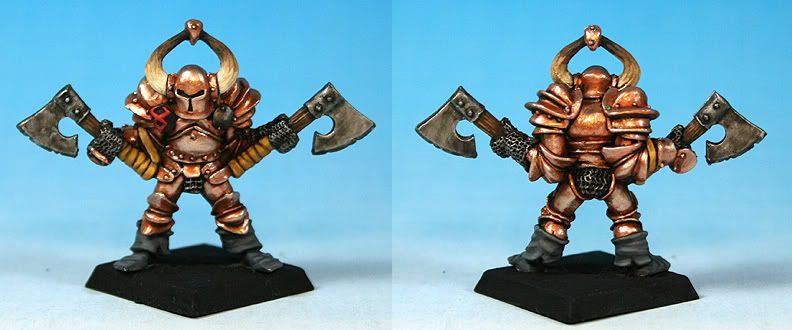
Next up was one of my favorite MM90/CWs...
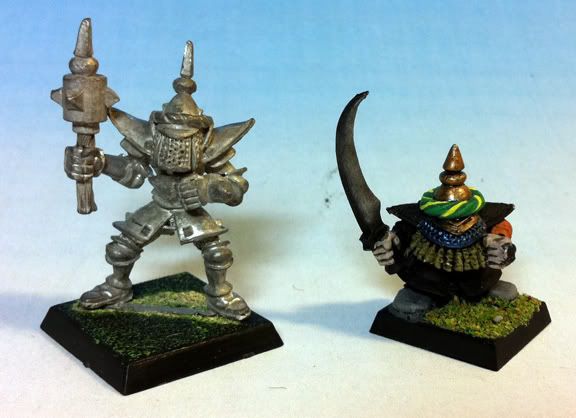
The MM90 that HlH sent along as the inspiration for the GW had flat black armor...which actually works pretty well on the dwarf...on the human it would have been too much black...so I opted for a similar feel with really dark metallic armor...and increased the amount of copper pieces to break it up a little. I love the way his mace came out.
Detail shots
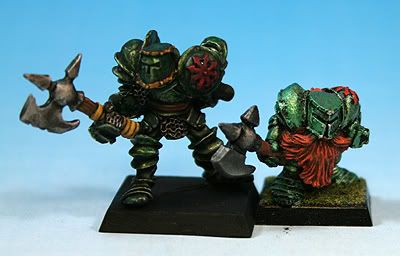
...Our next Victim...
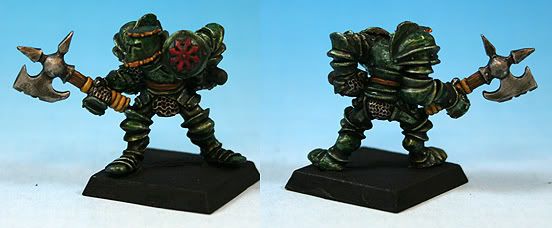
This guys armor was also achieved with a wash over silver metallic...in this case Reaper Green Wash with some Badab black mixed in. Its a darker green than the MM90's but I was unable to achieve a closer match. I may need to look for the Metal Medium that G2 mentioned in an earlier comment (cheers mate!) if I want to do colored metals again in the future.
...and his detail shots
More Chaosy goodness...coming soon!
Cheers,
Blue
Sunday, November 6, 2011
Chaos...the BIG and the small...Part 2
I had some time over the last week to put the finishing touches on the first batch of 3 Chaos Warriors that I am painting up for Hashut's Little Helper (HlH). These are the ones that I am painting to compliment his previously painted Marauder MM90s. These are proving some what of a challenge to me due to the fact that I don't have any of the colored Metallic paints that he painted his originals with. Luckily HlH has allowed me some leeway with the colors and I think they have come out fairly well. FYI HlH will be taking care of the bases and shields so they all match his existing units.
First up is one of my favorite MM90s and Chaos Warriors....(Remember...click for larger images)
Here is the Warrior Solo...these might be the best horns I've painted...I normally hate horns...these I'm actually happy with:
Next up is the Asian Inspired Cleaver guy!
Quite alot of difference between the MM90 and the Chaos Warrior on this one...there wasn't as much fabric to paint red...and when I tried to do red spikes on the Warriors helmet it just looked ridiculous....the red shoes tie them together though...:)
Here he is Solo:
And Finally the Purple Bunny Ears...
...and the Warrior Solo
I've got three more in process as we speak so I hope to have an update fairly soon.
Cheers,
Blue
Thursday, October 27, 2011
Fluffy and Fang....two heads are better than one!
The theme for the October painting challenge over on the CDO is "Beast." So I chose to paint up a Warhoud from Marauder Miniatures...the first of three that will go with their Chaos Warrior handler.
Watch out they drool!
Cheers,
Blue
Watch out they drool!
Cheers,
Blue
Wednesday, October 26, 2011
And There was MUCH Rejoicing!!!
Howdy all
So since I've gotten back into the hobby after a very long break (15 years or so) I've mostly been collecting and painting...but lately the urge to actually game with my minis has gotten stronger. However one of the major impediments to having an actual game was the lack of a table to play on...also the lack of money to make one....also the lack of space in which to keep it... :(
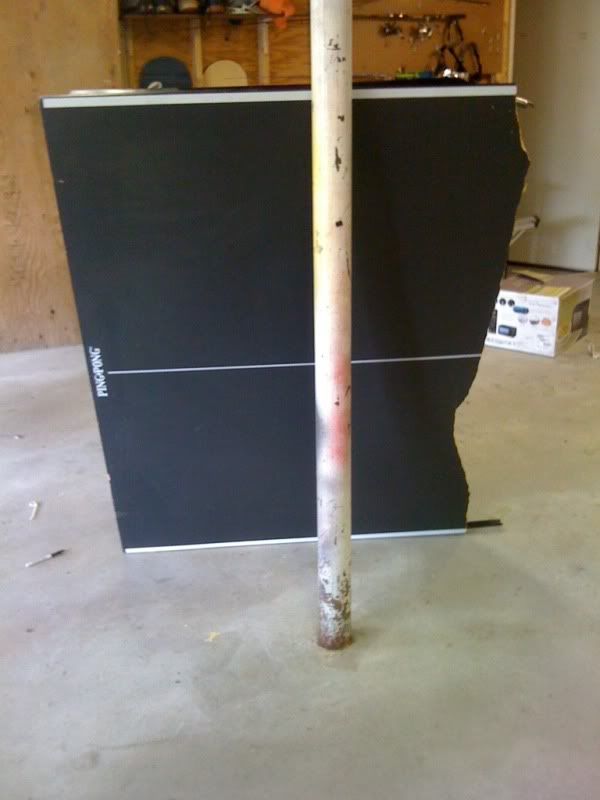
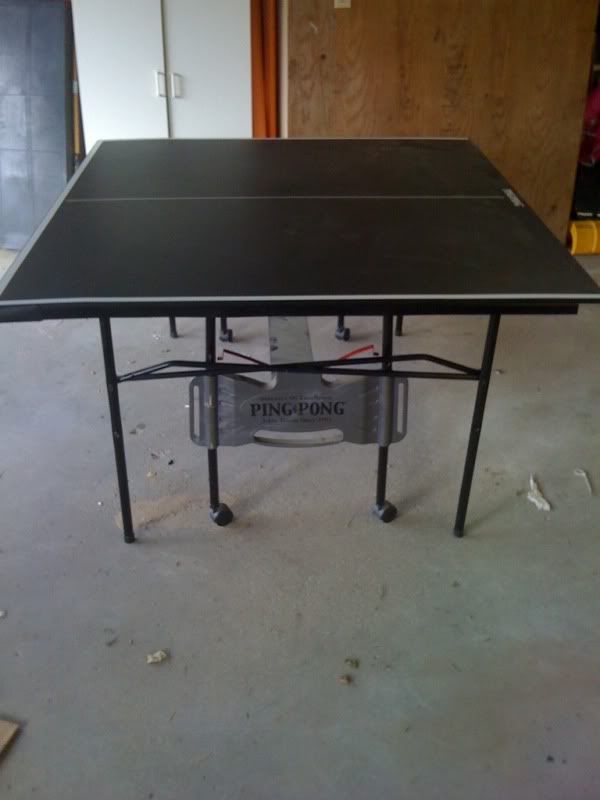
But! the other day I was looking through our local Craigslist and saw someone offering a folding Ping Pong Table for $30...I thought this would be a great compromise...a big table to game on that folds up fairly small...and a PP table for when the kids are older. So I called them and they told me I could have it but that it was cracked and wouldn't work for PP anymore...so I dropped the idea. Well yesterday the guy gets ahold of me and says I can have it for free if I come get it...I was there in 10min... lol "Awesome" I thought a huge table to play on (9'x5')...more than big enough for even large games. So I brought it home...and found that it was a cheap Piece of Crap...and it was wobbly....and as I started to set it up the "crack" turned into this...
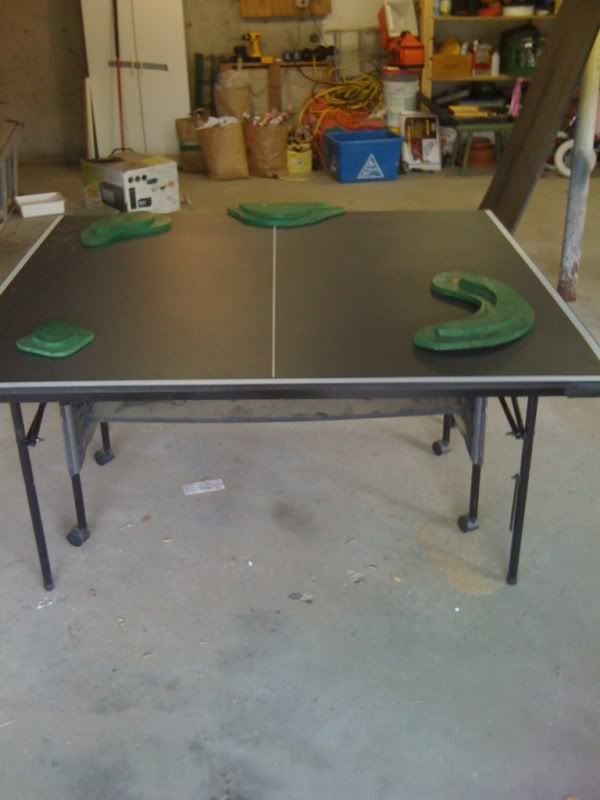
:'( :'( So much for my big table! But not to be deterred I threw that half of the table away and consolidated all the legs under the remaining half....this made the remaining half MUCH more stable and still left me with a decent size playing surface of 5'x4.5' Which should be great for Skirmish games and small WFB games (3rd edition of course). here is what she looks like now
Not too shabby for FREE!!
And Yes I'll have to play in my Garage...but its better than nothing!
Now I just need to come up with some low cost terrain, and some cheap acrylic to paint the table with and I'll be good to go.
Wish me luck!
Cheers,
Blue
Tuesday, October 18, 2011
Chaos...the BIG and the small...:)
One of the Members of CDO and CCM, who goes by the handle of Hashut's lil Helper (HlH), contacted me a couple of months ago about a trade deal...as the discussions continued it became clear that he had a ton of stuff I was interested in...and while I had a few things on my end for him it was far from a square deal...so he approached me about doing some commission painting for him to even things out. The figures he wanted painted were very interesting...As you may or may not know some Marauder's iconic MM90 Chaos dwarfs were modeled after Citadel's classic Chaos Warriors from the mid 1980's...HlH had painted a full collection of MM90s but wanted to create matching Chaos Warriors to go with them...and he asked me to help.
So after an anxious few days a rather largish box arrived at my door that contained not only our agreed upon trade items but also the Chaos Warriors and the MM90s that HlH wanted me to use as inspiration. So over the next few weeks I plan on cranking through a few of these...here are the first 5 pairs that I will be working on.
I'm really looking forward to digging into this project...I have currently glued the CWs into their bases and started removing mold lines and flash...Priming and first paint should hit this weekend.
Cheers,
Blue
Sunday, October 16, 2011
The Orc Horde Grows
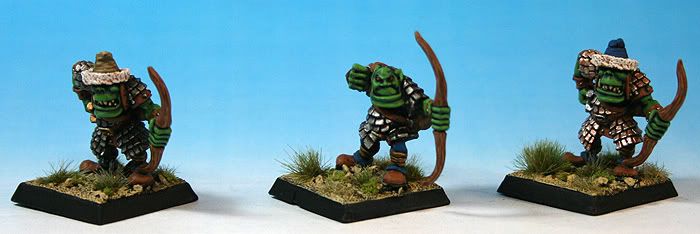
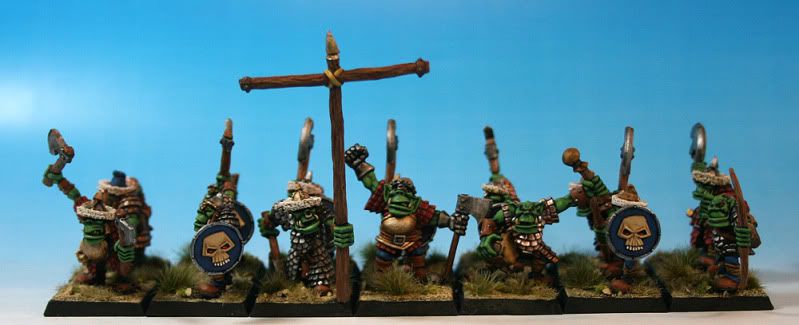
I finally had some time to get some decent pictures of the latest batch of Marauder Orcs that I've added to my Chaos Dwarf Warband. This is a mix of figures from the MB2 Orc Regiment and the MM25 Orc Warriors. All of these guys have metallic scale mail...the next batch will be back to the redish armor I like so much for them. The group includes some warriors with hand weapon and shield, some archers, and the standard bearer and musician for the warrior unit. Here are some pictures for ya.
The warriors:
The Archers:
The Standard Bearer
The Musician:
And Here they are ranked up with the rest of the Boyz...
I hope to expand this into a unit of 21 warriors and a small contingent of archers (there are only two sculpts so I can't have too much repetition...and the MM20 archers are proving quite elusive!) The other challenge will be finding enough of those skull shields...I think only have 5 more.
Anyway...these pictures were taken on a new photo "setup" that I'm using...so I need to work out some issues with glare on the background...but while I had it set up I also snapped these pictures of the Troll that I painted several months ago...though I might as well post them.
Next up...and interesting project with MM90s and classic Chaos Warriors.
Cheers,
Blue
Friday, October 7, 2011
A little Firepower for a Friend
Finally an update! It has been a crazy month with very little time for painting...but I did manage to finish up one project...Over on the Warhammer-Empire Forum they have a very interesting tradition...every year people sign up for a figure exchange...where in you create/paint a figure for another member that you send to them anonymously. I opted to participate this year for the first time and it has been fun. I chose to paint up this classic Citadel volley gun for fellow Empire fanatic Siberius who has an amazing Hochland Army. These figures were a lot of fun to paint...and I look fwd to adding a set to my own army in the future. Siberius's army has a very muted color palette that while effective was a challenge for me to paint...as I tend toward the opposite of muted...:). I sent the figures off in a hurry without taking pictures...hopefully he doesn't mind me using the ones he posted upon their joining his army.


Next up: a Group of Marauder Orcs is nearing completion!


Next up: a Group of Marauder Orcs is nearing completion!
Tuesday, September 6, 2011
My Basing "System"
Hello All!
Over the last couple of months a few people have asked me how I base my figures…so while I was working on my entry for the painting contest over at Warhammer-Empire I remembered to take some pictures of the process. Please note that some of these pictures were taken on my wife’s iPhone so are not of the highest quality…but I think they are good enough for this walk through. If you have questions please let me know.
Until a year ago I had only based a handful of figures…Ever. Thanks to the encouragement of Bugman’s members like Jimmytrout and CDO member Clam who liked the painting I was doing on figures but pointed out that they were not really “done” until they were properly based I was finally motivated to figure out a basing style for my figures. I wanted a system that was fairly quick, not too elaborate, and appropriate for gaming figures…which I consider all my figures…even though I haven’t had a game in 15 years! After a thorough search of the web for walk-through and tutorials I settled on my system. It is outlined below.
The Victim:
For this walk through I will be using this recently completed Marauder Empire Champion (one of my favorite Empire figures EVER). I chose him because he has a fairly open base that will allow me to demonstrate my technique easily…and I needed to finish him for the contest anyway…
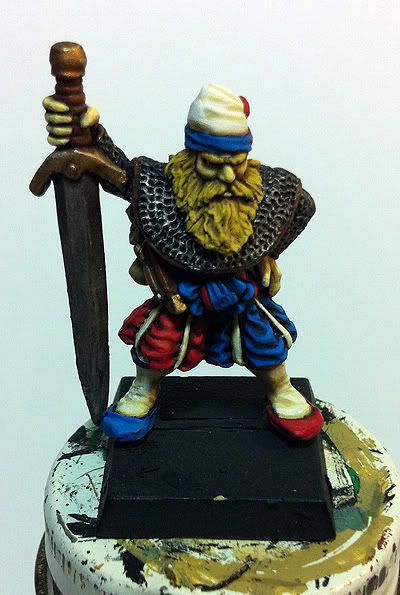
STEP 1: Sand the Base
The first thing I do with my bases is to cover them with sand. To achieve this goal I first apply White Glue (PVA)…typically Elmer’s…using a coffee stir stick. Put a fairly thick layer on the entire surface of the base…but try not to get any on the feet of the figure.

For sand I use some that I stole from my kids sand box….it has a good mix of grain sizes.

Take the figure and ”dip” the bases into the sand…making sure that grit gets on all the glue.
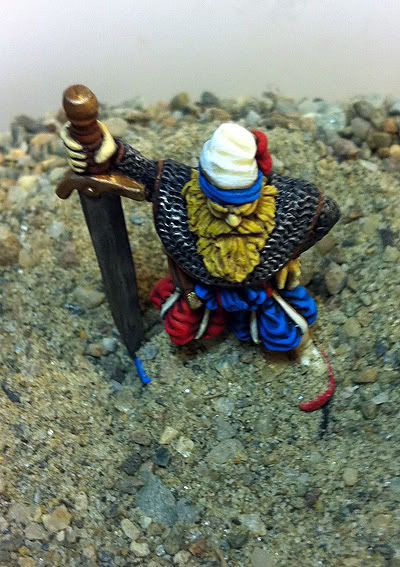
Lift it out of the sand and tip it to the side…tap it with your figure to shake off the excess sand.
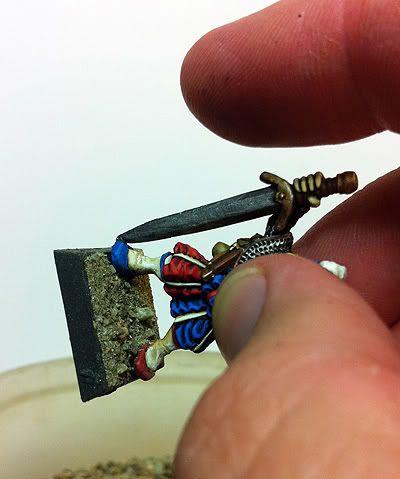
Then set him aside and let the glue dry…here is the sanded base
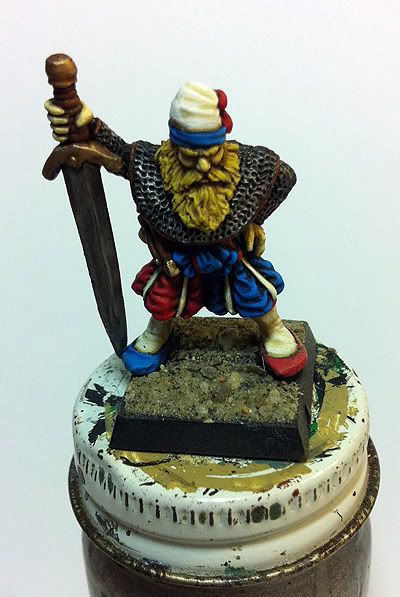
STEP 2: Paint the Base
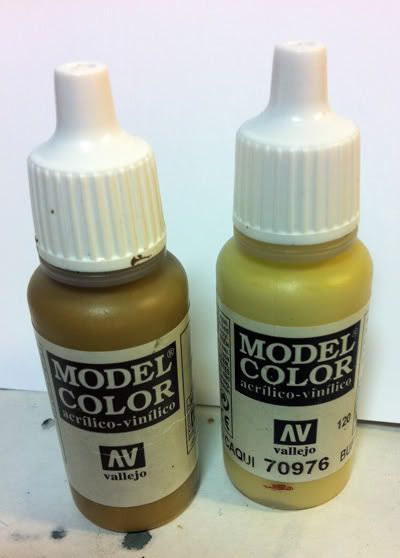
Now that the base has texture its time to get some color on it. I will be using these two colors on my base. They are Vallejo Model Colors Paints…the one on the left I believe is called Khaki (but as you can see its not labeled) the one on the right is 976 Buff.
To start with I thin the Khaki with a bit of water and paint it onto the base with a fairly thick layer.
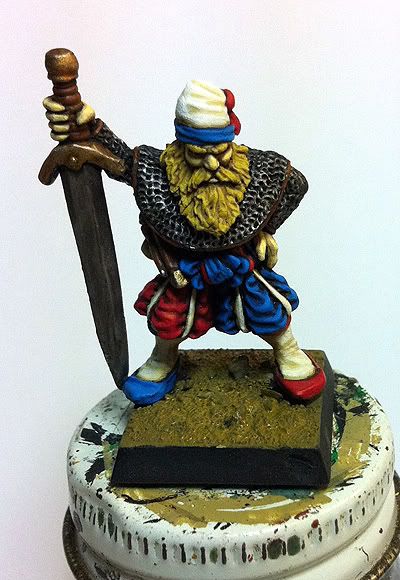
This is followed by a heavy wash of GW Delvan Mud
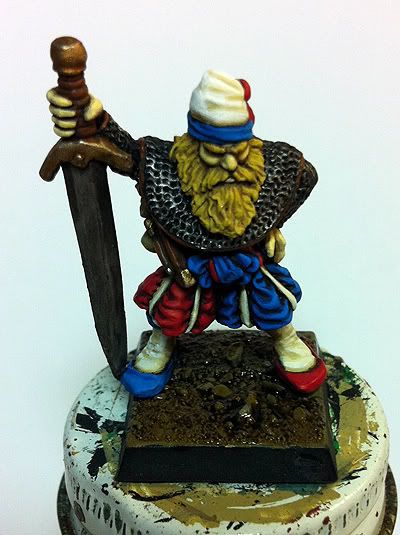
Once that is dry I drybrush the whole base with straight Khaki…this is a heavy drybrush…just leaving the wash in the deeper recesses.
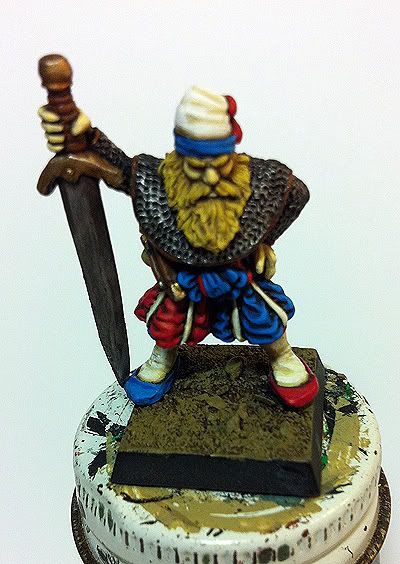
I follow this with a lighter drybrush of 50% Buff and 50% khaki
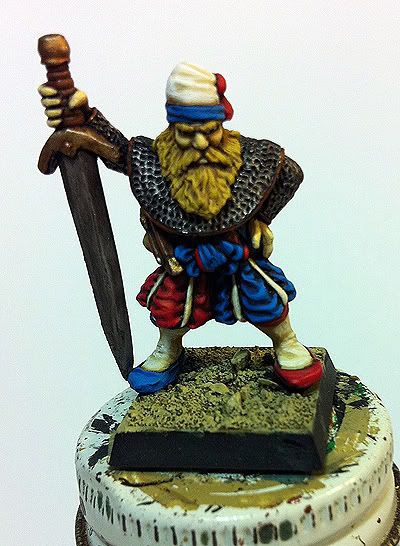
NOTE: with my Chaos Dwarfs and their allies…I use straight Buff for this second Drybrush…it gives a more “Arid” feel to the base. Adjust your colors as needed to fit your armies “theme.”
STEP 3: Add Vegetation
For dessert based armies you could stop at this point…but even a few pieces of grass, or a tuft or two can really make a base look sharp. Here is how I do it.
I start with placing some greenery in to the recesses around the larger pieces of sand on the base…these represent small plants that have found some shelter in and around larger rocks. For this I use Gale Force 9’s “Spring Undergrowth” flock blend
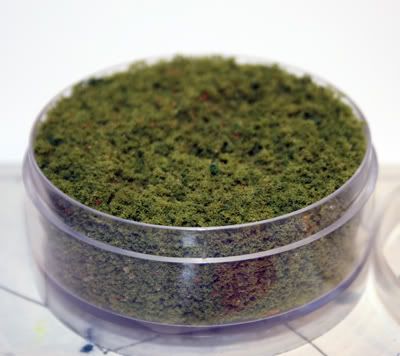
I put a small drop of White Glue into these spaces with my stir stick then use tweezers to place the flock into the glue drop. These are very small pieces of flock….that container should last me through about 5 armies at the rate I use it. But its one of those things that if you skipped this step you would miss them in the final result…despite their small size.
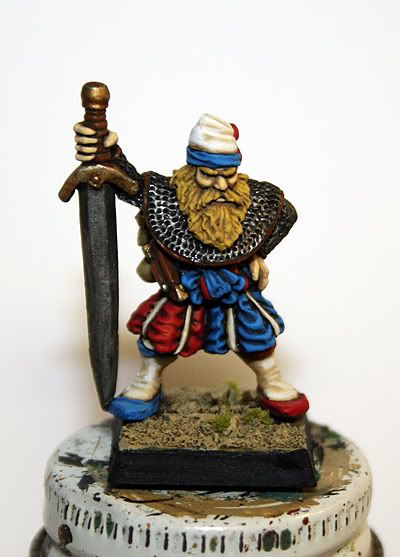
Next I place several small Tufts around the base. There are now several brands of pre-made tufts available to the hobbyist…the ones I use are by Silflor and I am very happy with them. They are available in the US from Scenery Express: http://www.sceneryex...s.asp?dept=1217 In Europe I would get them from Antenocitis Workshop: www.antenocitisworkshop.com I suggest buying the large packet of your chosen color because it comes with enough tufts in both 4mm and 6mm to do a whole medium sized army…and they are super easy to use.
NOTE: these are the same tufts sold under the Army Painter brand…AP buys them in bulk and cuts them down into those tiny packages they sell and doubles the price! Buy the Bulk packs from one of the folks listed above and you will get WAY more tufts for your money…plus AP tufts only come in 6mm which is too big for many 20mm bases.
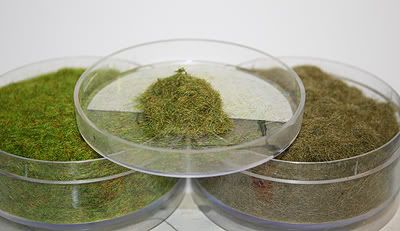
Here are the sheets of tufts I used for this figure In the back are 2 sheets of 4mm tufts in green and brown. In the front is a small sheet of 6mm tufts.
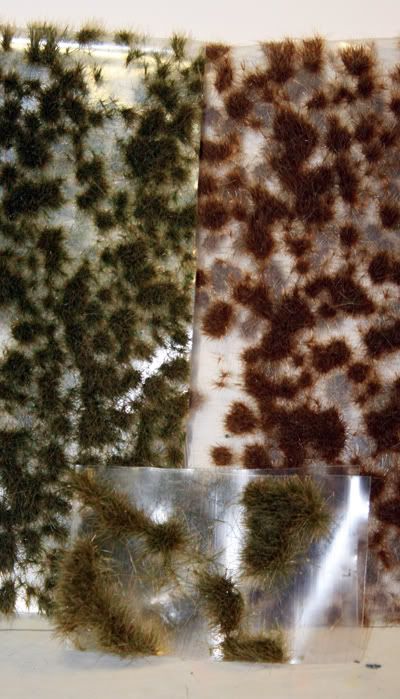
These are picked off their backing sheet with tweezers…the bottom of the tuft is dipped lightly into the PVA and placed into relatively flat spots on the base.
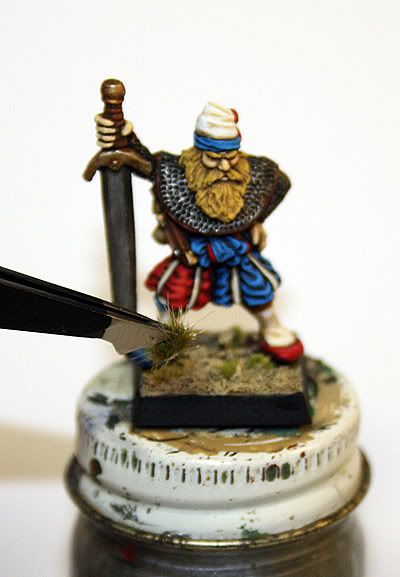
I typically put 2-4 tufts on a base…mixing the colors as I feel the need. Don’t get too carried away with the tufts…I’ve found that with basing “Less is More”…In my mind the base is there to accentuate the model…not overpower it…but again I digress… With 20mm bases I typically use mostly the 4mm tufts…I squeezed one 6mm tuft on the backside of this figure. You have much more ability to use the large tufts with 25mm (and up) bases.
Here is the base with tufts in place…glue still wet
The final Foliage I put on my bases are small patches of static grass. I use a mix of Gale Force 9 Static Grasses…in roughly equal proportions…Green Grass and Dead/Winter Grass…I’ve taken an old film canister and filled it with my custom mix…it will last for many…many figures…
To place the static Grass I put a couple of patches of glue directly onto the base…
…Then drop a heap of mixed Grass onto the glue.
Don’t be shy…get some on there!
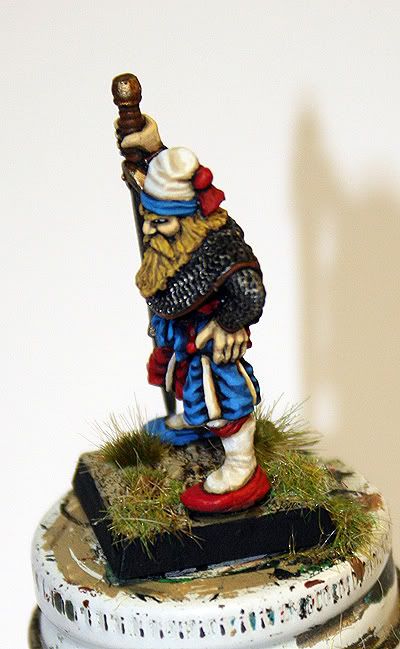
Set that aside for 1-2 minutes and allow the glue to tack up and grab onto the grass…then tap off the excess grass that isn’t stuck in the glue (much like we did for the sand earlier). At this point I often blow on the patches as well…this causes other loose grass to come off as well as causing the grass that is staying to stand up a bit better.
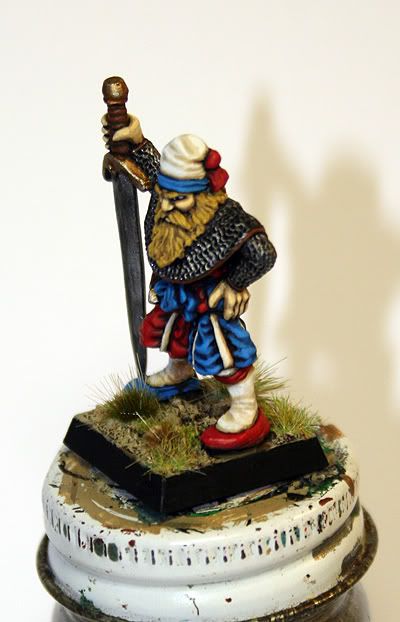
The final step in the process involves removing unwanted blades of grass from the base. Once the glue is dry I use my best tweezers to pull off pieces of the static grass or tufts that are too tall, touching the figure, hanging off the base, going in the wrong directions etc…etc… Now don’t get to carried away here…just pick off the ones that annoy your sense of “style”…again this is a really easy step to skip but makes a big difference in the overall feel of the base…IMO…YMMV.
STEP 4: Take some Decent Pictures
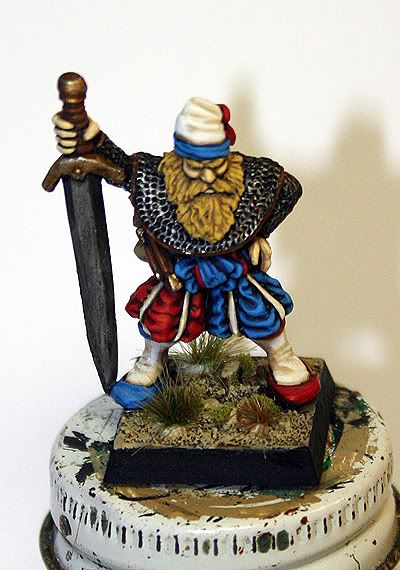
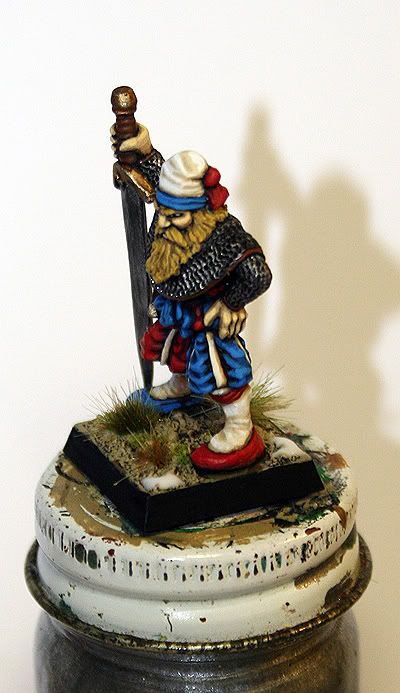
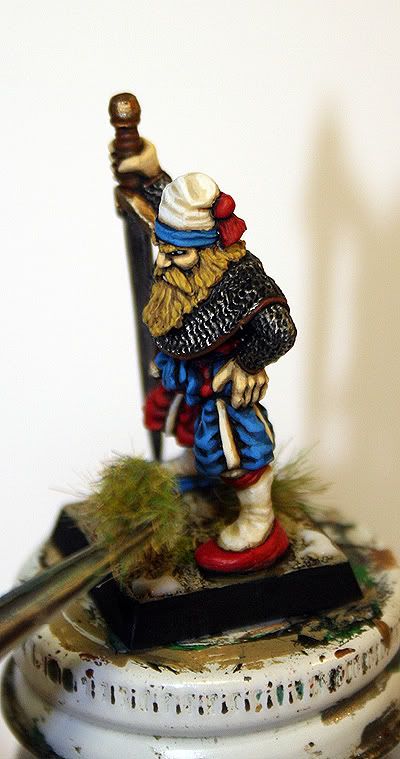
Here is the final product:
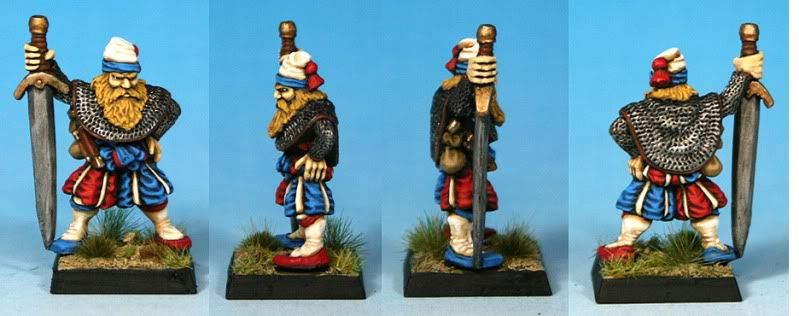
I hope this is helpful for others who are reluctant to base their figures….this system is fairly fast…quite cheap when the cost is spread out over the many dozens of figures these supplies will complete…and quite easy…If I can do it…you can too!
Cheers,
Blue
Over the last couple of months a few people have asked me how I base my figures…so while I was working on my entry for the painting contest over at Warhammer-Empire I remembered to take some pictures of the process. Please note that some of these pictures were taken on my wife’s iPhone so are not of the highest quality…but I think they are good enough for this walk through. If you have questions please let me know.
Until a year ago I had only based a handful of figures…Ever. Thanks to the encouragement of Bugman’s members like Jimmytrout and CDO member Clam who liked the painting I was doing on figures but pointed out that they were not really “done” until they were properly based I was finally motivated to figure out a basing style for my figures. I wanted a system that was fairly quick, not too elaborate, and appropriate for gaming figures…which I consider all my figures…even though I haven’t had a game in 15 years! After a thorough search of the web for walk-through and tutorials I settled on my system. It is outlined below.
The Victim:
For this walk through I will be using this recently completed Marauder Empire Champion (one of my favorite Empire figures EVER). I chose him because he has a fairly open base that will allow me to demonstrate my technique easily…and I needed to finish him for the contest anyway…

STEP 1: Sand the Base
The first thing I do with my bases is to cover them with sand. To achieve this goal I first apply White Glue (PVA)…typically Elmer’s…using a coffee stir stick. Put a fairly thick layer on the entire surface of the base…but try not to get any on the feet of the figure.


For sand I use some that I stole from my kids sand box….it has a good mix of grain sizes.

Take the figure and ”dip” the bases into the sand…making sure that grit gets on all the glue.

Lift it out of the sand and tip it to the side…tap it with your figure to shake off the excess sand.

Then set him aside and let the glue dry…here is the sanded base

STEP 2: Paint the Base
Now that the base has texture its time to get some color on it. I will be using these two colors on my base. They are Vallejo Model Colors Paints…the one on the left I believe is called Khaki (but as you can see its not labeled) the one on the right is 976 Buff.

To start with I thin the Khaki with a bit of water and paint it onto the base with a fairly thick layer.

This is followed by a heavy wash of GW Delvan Mud

Once that is dry I drybrush the whole base with straight Khaki…this is a heavy drybrush…just leaving the wash in the deeper recesses.

I follow this with a lighter drybrush of 50% Buff and 50% khaki

NOTE: with my Chaos Dwarfs and their allies…I use straight Buff for this second Drybrush…it gives a more “Arid” feel to the base. Adjust your colors as needed to fit your armies “theme.”

STEP 3: Add Vegetation
For dessert based armies you could stop at this point…but even a few pieces of grass, or a tuft or two can really make a base look sharp. Here is how I do it.
I start with placing some greenery in to the recesses around the larger pieces of sand on the base…these represent small plants that have found some shelter in and around larger rocks. For this I use Gale Force 9’s “Spring Undergrowth” flock blend

I put a small drop of White Glue into these spaces with my stir stick then use tweezers to place the flock into the glue drop. These are very small pieces of flock….that container should last me through about 5 armies at the rate I use it. But its one of those things that if you skipped this step you would miss them in the final result…despite their small size.

Next I place several small Tufts around the base. There are now several brands of pre-made tufts available to the hobbyist…the ones I use are by Silflor and I am very happy with them. They are available in the US from Scenery Express: http://www.sceneryex...s.asp?dept=1217 In Europe I would get them from Antenocitis Workshop: www.antenocitisworkshop.com I suggest buying the large packet of your chosen color because it comes with enough tufts in both 4mm and 6mm to do a whole medium sized army…and they are super easy to use.
NOTE: these are the same tufts sold under the Army Painter brand…AP buys them in bulk and cuts them down into those tiny packages they sell and doubles the price! Buy the Bulk packs from one of the folks listed above and you will get WAY more tufts for your money…plus AP tufts only come in 6mm which is too big for many 20mm bases.
Here are the sheets of tufts I used for this figure In the back are 2 sheets of 4mm tufts in green and brown. In the front is a small sheet of 6mm tufts.

These are picked off their backing sheet with tweezers…the bottom of the tuft is dipped lightly into the PVA and placed into relatively flat spots on the base.

I typically put 2-4 tufts on a base…mixing the colors as I feel the need. Don’t get too carried away with the tufts…I’ve found that with basing “Less is More”…In my mind the base is there to accentuate the model…not overpower it…but again I digress… With 20mm bases I typically use mostly the 4mm tufts…I squeezed one 6mm tuft on the backside of this figure. You have much more ability to use the large tufts with 25mm (and up) bases.
Here is the base with tufts in place…glue still wet

The final Foliage I put on my bases are small patches of static grass. I use a mix of Gale Force 9 Static Grasses…in roughly equal proportions…Green Grass and Dead/Winter Grass…I’ve taken an old film canister and filled it with my custom mix…it will last for many…many figures…

To place the static Grass I put a couple of patches of glue directly onto the base…

…Then drop a heap of mixed Grass onto the glue.

Don’t be shy…get some on there!

Set that aside for 1-2 minutes and allow the glue to tack up and grab onto the grass…then tap off the excess grass that isn’t stuck in the glue (much like we did for the sand earlier). At this point I often blow on the patches as well…this causes other loose grass to come off as well as causing the grass that is staying to stand up a bit better.

The final step in the process involves removing unwanted blades of grass from the base. Once the glue is dry I use my best tweezers to pull off pieces of the static grass or tufts that are too tall, touching the figure, hanging off the base, going in the wrong directions etc…etc… Now don’t get to carried away here…just pick off the ones that annoy your sense of “style”…again this is a really easy step to skip but makes a big difference in the overall feel of the base…IMO…YMMV.
STEP 4: Take some Decent Pictures
Here is the final product:

I hope this is helpful for others who are reluctant to base their figures….this system is fairly fast…quite cheap when the cost is spread out over the many dozens of figures these supplies will complete…and quite easy…If I can do it…you can too!
Cheers,
Blue
Subscribe to:
Comments (Atom)


